Friday, 21 November 2014

Weekly Deals 19 November 2014

With Christmas fast approaching, pick up a couple of banner kits at bargain prices and really jazz up your home decor this year.


Order online here.

Happy Friday!
Karen

Monday, 10 November 2014

Crazy Prices on Designer Series Paper

There's a lot of Designer Series Papers on sale in the Clearance Rack right now.  You can check them out online here.

But here's a little sticky-beak to wet your appetite.  Keep in mind that these are retired, however they would normally be $18.95 a pack (12 sheets of 12" x 12" double-sided).  It's a great opportunity to stack up on beautiful quality papers at a fraction of the usual cost.


Email me if you'd like to order, or go straight to my online store.
Cheers
Karen

Sunday, 9 November 2014

Weekly Deals 5 November

More cute stuff this week available at great savings:

These journals are divine.  They have 60 pages of patterned Designer Series Paper that is so lovely to write on, add photos, or just stick in bits and pieces that you want to keep.

 I used mine on our recent holiday to Italy & Croatia.

And who can resist a punch and edgelits that are on sale?  Now's the time to grow your stash.

Buy online in my store.   Just select Weekly Deals from the menu on the left, or email/phone and I'll order for you.

Happy days
Karen

Thursday, 23 October 2014

Silhouettes Class Last Night.

We had a great class last night doing a couple of different silhouette techniques.

This first card uses Serene Silhouettes stamped in black over a background of Crushed Curry ink using one of the stamps from Work of Art.  It's so simple, and you can dress it up in many different ways.

Here's a different look using Tangerine Tango and another stamp from the Serene Silhouettes.


Our second card was all about creating a silhouette using a die cut and a frame.


Cutting frames can be quite tricky if you're not good with a ruler and a craft knife.  Enter the Stampin' Trimmer.

This clever cutting tool gives you the ability to cut frames from any size of cardstock up to 30.5cm (12").

And with the point on the cutting handle/blade you can be sure that your measurements are spot on every time.

Also don't forget to check out this week's weekly deals:

Let me know if you'd more info on anything you've seen here or if you'd like to place an order.

You can also order online here.

Happy Thursday.....on the slide down to the weekend now, yay!!
Karen

Friday, 17 October 2014

Bloom with Hope and Blendabilities

These are the easiest markers to work with......


Love this simple gift card.  It's such a pretty stamp set.  The Blendabilities colour is Coastal Cabana. I like to colour images using the darkest marker first (they come in sets of 3, so it's easy to get it right first time!).

If you'd like a copy of the current catalogue, give me a call or send an email.  Visit the contact page here.  You can also shop online here.

Have a lovely weekend.
Cheers
Karen

Wednesday, 1 October 2014

Weekly Deals - New Today 1 October 2014

This week's deals are below.......
Think I may have to order some of those boxes - they're a great size and you get 3 in a pack....Yay! The finished box is 15.2cm x 15.2cm and 11.5cm high, so it will hold quite a lot of goodies.
 
I decorated this one with a band of Designer Series Paper (Nordic Noel 135822) - I used Snail adhesive (104332) to attach it.  The Fancy Foil Vellum (133363) is a lovely overlay (also comes in stripes and hearts, gold and silver) and our  Burlap ribbon (132140) which makes a fabulous bow.

Call or email me to order, or go direct to my online store here.

Happy Wednesday
Karen

Wednesday, 17 September 2014

Weekly Deals

This week's deals are available in my online store here.  Get them online at these prices until Tuesday 23 September at 11:50pm.  Don't miss out!


Cheers
Karen

Monday, 15 September 2014

Sneak Peek at this Weeks Card Making Class

This Thursday evening one of our projects is a Tri-Fold card.  This is one take on a Tri-Fold design that I absolutely love.  The idea comes from Mandyb on SCS.


If you 'd like to join in, please email me as soon as possible to book your place at the craft table.
Thursday 18 September, 7:15 - 9:15pm in Lilyfield.  Address supplied on booking.

Cheers
Karen

Friday, 12 September 2014

Hot Diggity Dog

I'm not  a fan of cutesy cards and paper craft projects so I was a bit surprised at myself for buying this stamp set......does that show a lack of self control?!

That said, I do like the little dog's heads and was quite pleased with the way my cards turned out.
I named this little guy Scottie.  I've used the Lullaby Designer Series Paper (#133695).  Isn't it cute?  Love the colours in this one - Baked Brown Sugar, Coastal Cabana, Pistachio Pudding & Hello Honey.  I stamped Scottie with Chocolate Chip ink and coloured his sweater with Coastal Cabana and Hello Honey.    To make perfect layers for a Thinlits card, check out a great video on Youtube from Jan Tinklenberg.

The back of the circle looks like this......
And the back of the card has a panel of Whisper White card stock to write a greeting.

My second card is more traditional in shape:
To make the ground/grass, I used a stamp from Work of Art. one of my favourite sets right now.  The paws were from my craft stash.  Totally cute right?!  Just wish I could remember where I bought them.  Something tells me I've had them for years just hanging around waiting for the right project.....giggle.

Happy Hot Diggity Dog Friday.
Karen


Monday, 30 June 2014

Scrapbook-On-The-Go Part 2

Here's a few more pages.  Again quite plain, but also nice as the journal already had pages that are made of designer series paper so with a bit of washi and some journaling I can get away without a time consuming fussy look. 


My pocket has a little bit of rope attached that I recycled from a clothing label. As I bought the shorts on the holiday it's a little memory as well as a great embellishment. 
This picture shows the pocket I made before we left home. It's attached with sticky strip and I used a punch to make a space so you can easily remove the contents - in this case, a map. 

Back with more tomorrow.  
Cheers
Karen 


Friday, 27 June 2014

Smash Book Beginnings

Here's the first few pages of my diary/smash book for our trip to Italy & Croatia. 


Not much happens on a plane so our luggage receipts, a "wake me up for food" sticker and a flattened JD bottle top are my only offerings. And no I didn't bring a hammer or my Big Shot... I hit it with my shoe!!


One of the nice things about the "This and That" journal is that some pages have ready made pockets.  This one is great for a postcard and blurb about the hotel.  


I couldn't fit this gorgeous picture in so folded it in half. 

A ready made mat was used for journaling. 

So that's the first bit.....if you're a traditional scrap booker you will think its plain. But my goal is only to diarise and keep bits I collect along the way.  

Back later with more. 
Cheers
Karen


Scrapbooking On-The-Go

With the arrival of Project Life at Stampin'Up! I finally feel that there is a scrapbook option for me. That said, I thought I'd start even easier with a home made on-the-go "smash book" for our holiday in Italy & Croatia. 

I always collect bits and pieces - ticket stubs, restaurant cards, menus, maps and brochures when I'm on holiday with the intention of creating a scrap book when I get home.  This NEVER happens! All I end up with is a shoe box full of stuff!  It has to change I told myself.  So here's what I'm doing;

Before we left home I grabbed some supplies.....

This & That album from the Epic Day collection. 
Epic Day coordinating stickers (they match the colour scheme)
Epic Day Washi Tape
Pre stamped images in matching colours
Punched flowers, banners, stars etc
Made tags for journaling 
Snail
Double sided tape
Glue dots
Scissors
Corner rounder punch
A couple of pens in coordinating colours for journaling.

I also made some pockets using Epic Day designer series paper and pre attached sticky strip to the back of the flaps so I can insert them wherever I like and use them to hold maps or things i'd like to be able to lift out and look at.  

Another consideration for this trip is that I don't want to print photos so wherever possible I'll use brochures to illustrate the places we visit. 

My main goal is to go home with a diary of our trip completed that has all the memorabilia stuck in.  It's ready for the bookshelf if I achieve my goal!

Pop back over the next week to see my progress. 

Ciao for now!
Karen


Thursday, 30 January 2014

Darling Stamp & Scrap Club February Project for Sale-a-Bration

It's back to school & back to work for most of us this week, but don't despair!  Pop along to Darling Stamp & Scrap Club on Saturday 8 February and make this gorgeous project:
These are all the rage right now, and the opportunities are endless.  I'll give you full instructions on how to make this "card in a box" and you can customise it for your needs.  A supply list is provided on booking.

Call 0427 063 376 or email me on kecumming@gmail.com to reserve your place.  Hurry, space is limited.
Cheers
Karen

Tuesday, 21 January 2014

Another En Francais

I just stumbled across a photo of a card I made last year, and it uses the En Francais background stamp again.  This time it's used in the more direct sense and I think it creates an elegant backdrop for the flowers from Everything Eleanor.


Hope your week is off to a great start!
Cheers
Karen

Saturday, 18 January 2014

Playing with Background Stamps

Background stamps are so useful and versatile, but how often do you just pull them out to use as a "background"?

Why not make a feature of them occasionally?

Here's 5 different cards I've made using En Francais.  Order it here.
Each card showcases the stamp in a creative way and hopefully gives you ideas on how to extend your stamps so you get more out of them.

 This card was made using the flourish from Everything Eleanor.  Look closely and you'll see the image is slightly darker in places.  I first inked up the flourish using Pool Party ink, then I inked up En Francais with Marina Mist ink.  I "kissed" the two stamps together and the result is the marbled effect on the flourish.
 This card was made by inking En Francais in Basic Black ink and stamping directly onto Designer Series Paper.  To ensure the stamp shows up well, I chose a paper with a small pattern in a light colour.
 Looks complicated?  Well, it's not!  I stamped En Francais in Real Red onto a piece of Pool Party cardstock.  Then I used my hexagon punch to cut out about 10 or 11 shapes.  Tip:  Pay attention to the direction of the pattern - I wanted all my words to be the right way up!!   Next, I laid each hexagon onto a piece of Real Red card stock that measured 9.5cm x 13.8cm in a diagonal pattern.  I glued them all on with snail adhesive.  Then I ran the whole thing through the Big Shot with the polka dots embossing folder.
 Tags are really in right now and I've started by decorating a plain white one using En Francais inked with Pistachio Pudding.  You can then add any layers or embellishments that you have available.
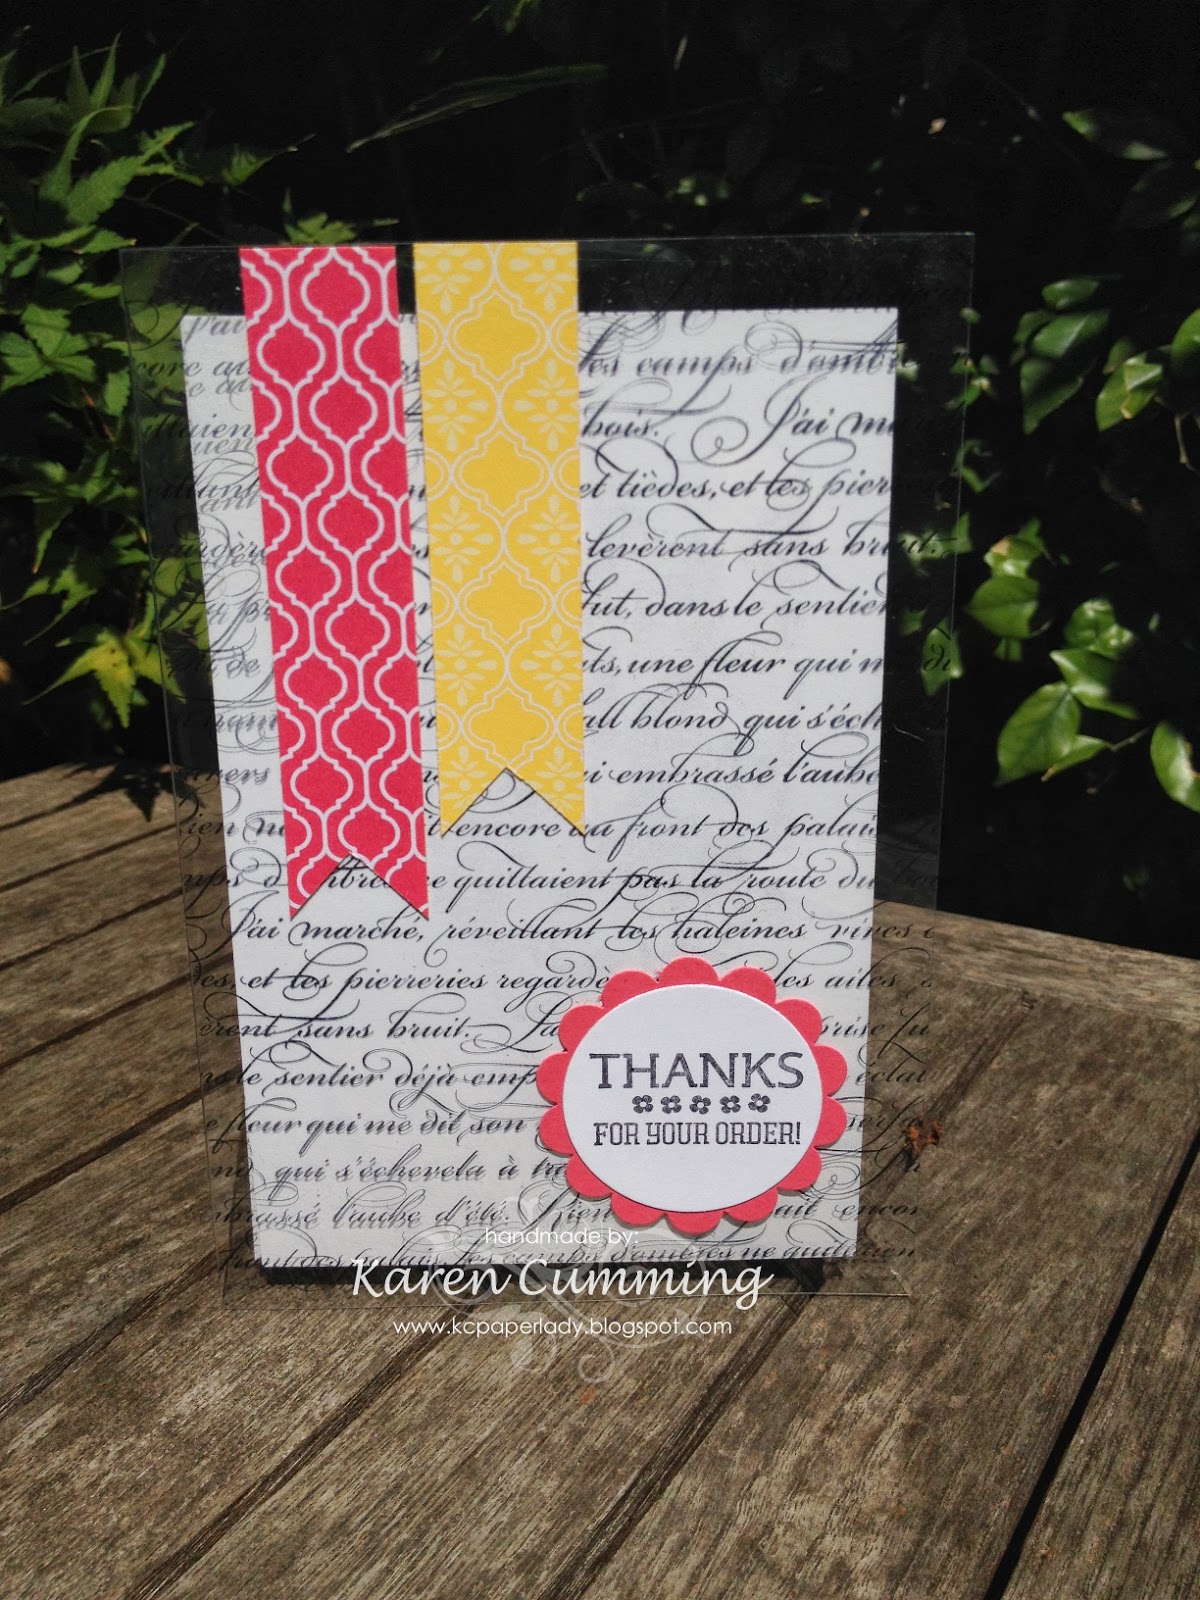
This last one is a bit harder to see, but En Francais was inked with Black StazOn and stamped onto a window sheet, or piece of acetate - dig out those old OHT's at the back of the drawer! I used Whisper White card stock on the inside to create the note area and it's stuck to the acetate sheet behind the banners.

Note:  Working with vellum and acetate is tricky when it comes to glue.  You can either buy some vellum glue dots - they're quite good, but I don't think you ever get a truly invisible fix.  Or you can choose to add adhesive only in places where you know it will be covered by embellishments - this can be hard to work out at the start because you almost have to design the project backwards.

Anyway, I hope this may give you some ideas for expanding your use of background stamps and hopefully you'll find even more ways to use them once you start playing.

Cheers
Karen


Friday, 17 January 2014

A Revolution

This is the time of year when I have a big clean out of my craft room.  It's so liberating!  And I often discover hidden treasures :)

This year though, there's a change coming......

What are all those sticky things you say?  Yep, the labels on my clear mount stamps are comin' off!  I've been having trouble getting the stamps to stick to the blocks despite regular "block cleaning".  So, when some new stuff arrived in the mail this week.....giggle.....I decided not to add the stickers to the unmounted stamps and just try them directly on the blocks.  OMG what a revolution it was!  

Yes, there will be some adjustments.  Like how do I feel about not "seeing" the image through the block?  And how many times will I stamp upside down?  Not me, the stamp!  But I feel like I'm ready to try it and it really is refreshing to not have the stamp fall off right at the moment of truth!

Now, here's some pics of a couple of postcards I CASED from the current catalogue:

 I've use the Post Card stamp - LOVE it! And it's so perfect for dropping someone a quick note.
 The Postage Due stamp set is gorgeous in a collage style on the reverse side.

And the greetings are from Four You.  All these stamps are in the current annual catalogue.

If you'd like to order any of the items you see, send me an email or give me a call and I'll be happy to help you.
Cheers
Karen