Showing posts with label Christmas. Show all posts

Friday, 14 December 2012

12 Days of Christmas - Day 3 Triple Time Card

I thought a Triple Time card was appropriate for today.  This is a really popular technique at the moment (I like to be on trend....giggle giggle..).   However, I've chosen none traditional colours which is kind of unlike me because I seem to be heading red & green all the way this year! 


I've used the Delicate Doilies stamp set in Elegant Eggplant & Rich Razzleberry.  Don't you love having a product that can stretch out it's usefulness all year long?   And I've spiced it up with silver metallic ink - it was a pad that we used to carry at SU but is now retired.    This particular one is great because it's an embossing ink but if you are prepared to wait a few minutes, it will dry nicely without heating, especially if used on dark cardstock. 


The greeting & mistletoe images are from the lovely Joyous Celebrations stamp set in the holiday catty right now (only until 31 Dec).  BTW I've heat embossed the greeting even though it's stamped in classic ink (Elegant Eggplant).  You just have to move quickly and get the powder on it immediately. 


White Organza ribbon & self adhesive rhinestones complete the shimmery look.  I cheated with the bow.  It's separate from the ribbon that goes across the card.  I attached the horizontal ribbon on the back of the largest white layer with snail.  Then the bow is attached with a glue dot.  If you are bow challenged like I used to be, this is the BEST ribbon because it's really easy to tie a gorgeous bow and it doesn't crease no matter how much you fiddle with it.

Dimensions for making a triple time card are as follows:

Card Base : A5, or 14.8 x 21cm folded in half
White or neutral layers:  143mm x 100mm
                                         113mm x 73mm
                                          83mm x 40mm
Coloured cardstock layers (same colour as base):  118mm x 78mm
                                                                                   88mm x 45mm.

1. Attach the 3 white/neutral layers together with dotto or repositionable adhesive, making sure they  are all centred nicely.
2. Stamp your images all over randomly, or as I like to say with "studied carelessness"!
    You'll hate the way they look right now but DON'T PANIC!
3. Carefully separate the 3 layers, and attach them to their appropriate coloured cardstock layer with snail.   I like to do these one at a time starting with the smallest piece so I don't accidentally flip the images and stick anything upside down.  Easier to do than you think!
4. Add your sentiment, ribbon, etc etc and THEN stick the whole thing to the card base.

I do hope you're enjoying my Twelve Days of Christmas projects.  Show me some love and leave me a comment....please!

Karen
                                         

Wednesday, 12 December 2012

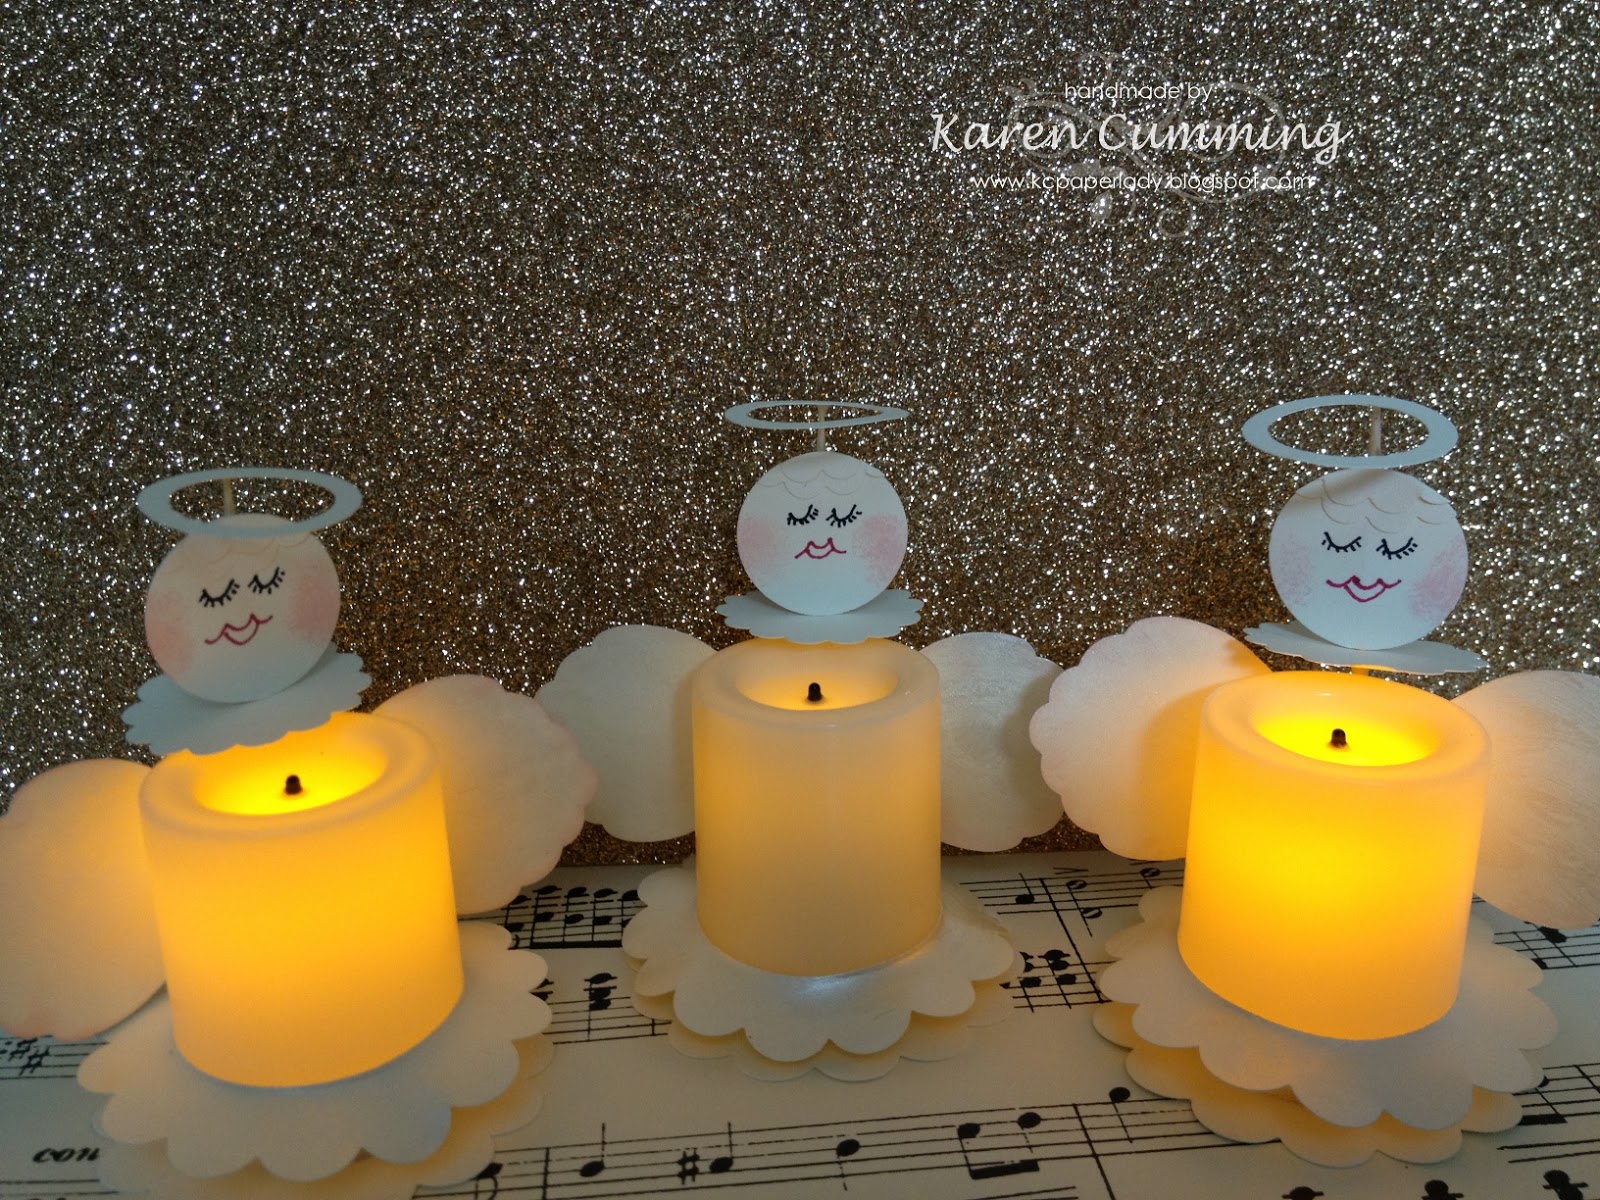
12 Days of Christmas - Day 1 Angel Votives

I've been wanting to do this for a couple of years now, so I'm excited that I'm finally getting on with it! 

My first project is a bit cutesy, a bit crazy and possibly a tad strange!!

I was inspired to do something with these battery operated votives that I bought after I made Becky Roberts' snowman.  

Anyway, they're my take on a votive angel.


Here's what you do:

1. Punch out a 2 3/8" scallop circle. Use the itty bitty punch pack to punch a circle out so you can switch the votive on and off.  Glue it to the base.


2.  Skirt. Punch a 1 3/8" circle, then with the 2 3/8" scallop circle punch over the top so you have a scallop with a big hole in the middle.  Sponge all over with frost white glimmer paint.  Once dry, slide it carefully over the votive to make the skirt.

3. Halo:  Punch out a 3/4" circle then go back over it centreing the 1" circle punch.  Glue this to the very top of a toothpick.  I used Tombow but hot glue would be quicker.


4.  Face:  Punch a 1"circle.  Hand draw eyes and lips.   Use a dauber with pink ink for the cheeks. 
I added hair by attaching a couple of rows of the scallops from the small scallop punch.  Hot glue this to the toothpick just under the halo.

5.  Punch a 1 1/4" scallop circle.   Use the 1/16" punch to make a hole in the centre.  Slide this up the toothpick so it forms a frill around your angel's "neck".

6.  Hot glue the toothpick to the back of the votive.

7.  Wings;  punch two of the largest petals from the blossom builder punch.   Sponge them with glimmer paint and dauber around the edges with Pink Pirouette ink.  Attach them over the toothpick at the back of the votive with hot glue.

Hope you enjoyed this quirky little project.

Be sure to pop back tomorrow for day 2!
Cheers
Karen

Monday, 9 July 2012

What's on Your Desk?

After packing away all my tools & leftover materials from last week's classes, I had some paper scraps on the desk that I couldn't throw away!  Bet that happens to you too, right? 

I also have to make a start on my Christmas cards soon - no, not my own, I always leave those till the last minute, but my stash for our Australian Armed Forces.  If you want to know more about this, check out the page on my sidebar.


Supplies used:
Stamp Set: Baroque Motifs & Word Play
Cardstock:  Whisper White & Real Red
Ink: Silver pigment ink
DSP: Twitterpated & Basic Black from the Neutrals Stack
Large silver brad is from our Hodgepodge Hardware.
Stripes embossing folder, Big Shot
Silver embossing powder & heat tool

Thanks for looking!
Karen


Monday, 12 December 2011

Yummy

Who doesn't love cupcakes?

I made this cute little set as Christmas gifts for my team.   12 patty cases with a holly pattern, 12 toppers & some red and green Christmas tree sprinkles.  So cute.


I made the box to size.  That's super easy to do, just place the items you want to pack into a box on your SU grid paper........order it from me today......then you can see how big the base of the box needs to be.  Add a couple of centimetres (or more) for the sides of the box and cut your card stock to size, scoring it at the appropriate depth.   I use a Scor-Pal for this but a ruler & stylus work just as well (hurry up SU, we want our own company scoring tool please!).

Lastly, you make a wrap out of acetate and again use your grid paper and box base to determine the size and the score marks.   Add a stamped piece and some ribbon and your done.

Hope you're getting through your Christmas preparations.
Cheers
Karen