Wednesday, 1 September 2021

Dragonfly Garden Meets Expressions In Ink - Card Two

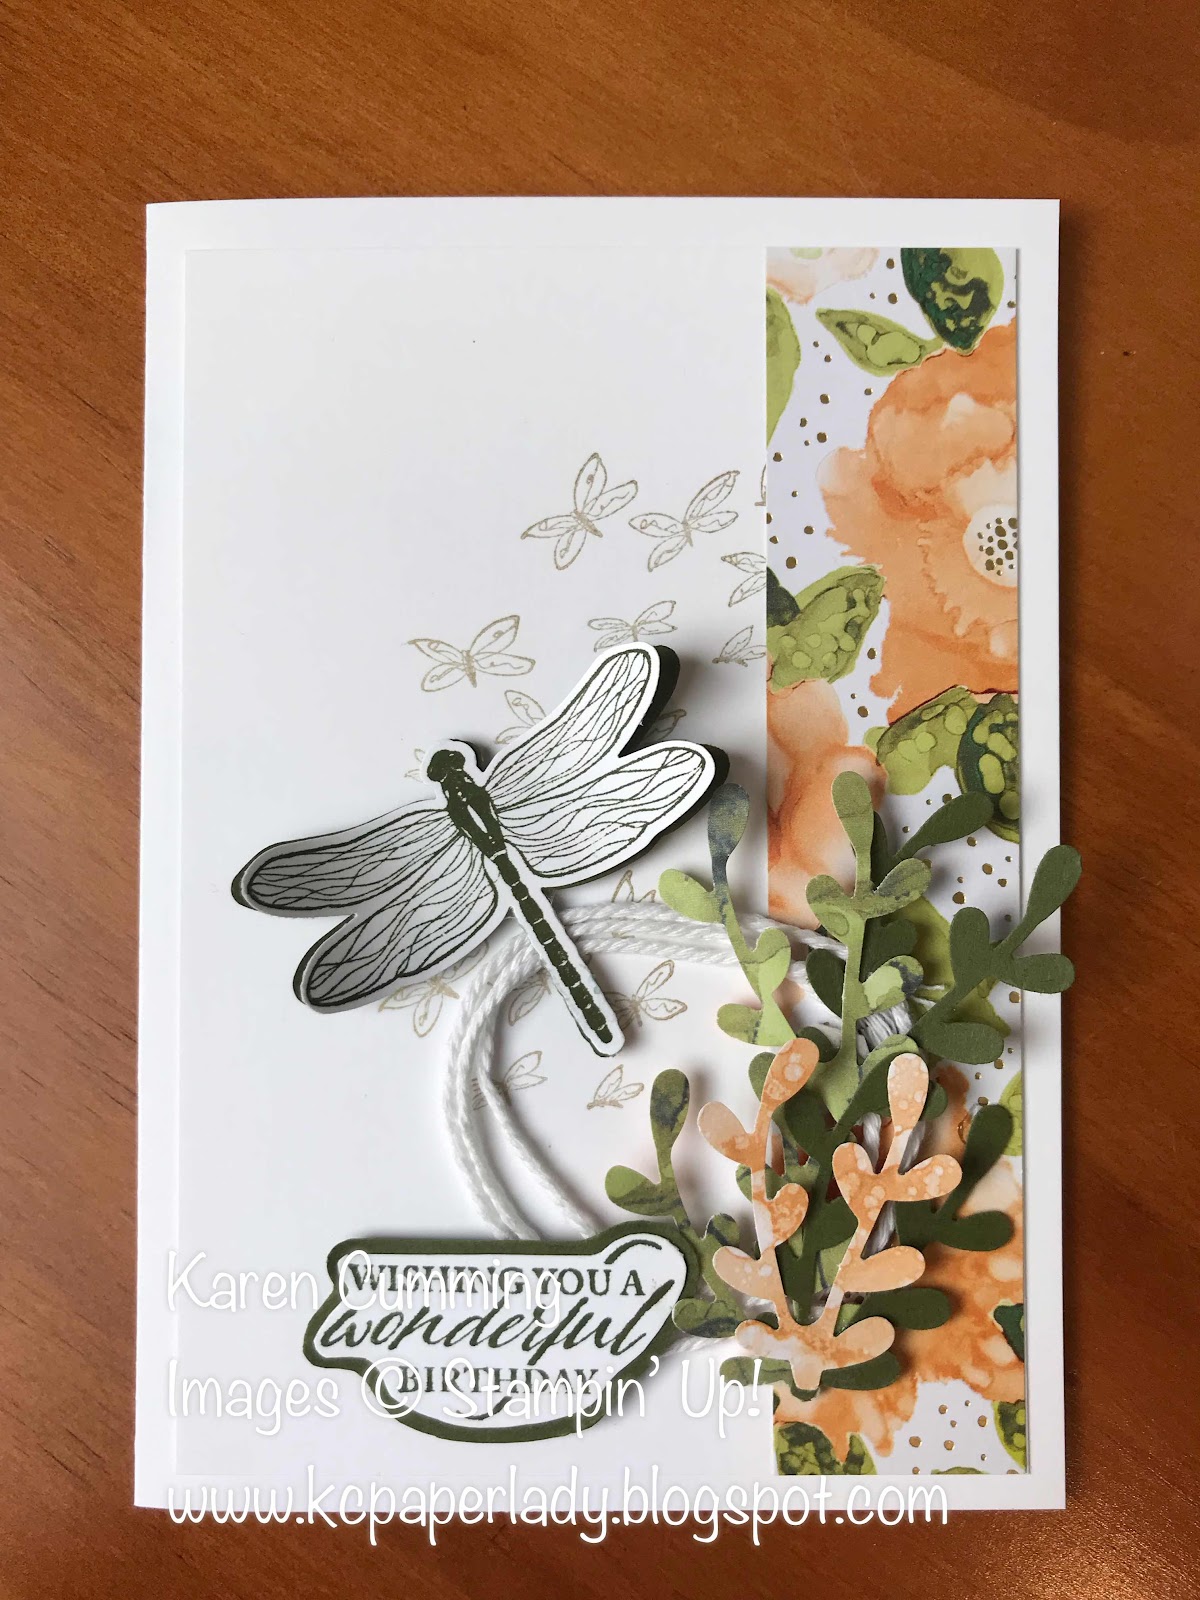
This lovely design was inspired by a card made by Gail Ellis, of Blue Rose Paper Designs.  

I've used the same piece of DSP as for yesterdays card.  It has some gold 'spatters' in it so I stamped the tiny butterflys in gold in to tie it all together.  The dragonfly is stamped in Evening Evergreen ink.


Those cut little leaves were made with the Sprig punch which is so versatile and you can use it all year round, although it's perfect on Christmas cards and even to make a wreath with.


Once again, the dragon fly has been stamped and punched...poor thing....and layered on a second punch that was cut from Evening Evergreen cardstock.

I've used some thick white bakers twine under the main panel, and this is a great way to use up any scraps of twine or ribbon you may have.

If you like it, please leave me a comment below.  And get crafty, go on, make something!

Cheers
Karen

Tuesday, 31 August 2021

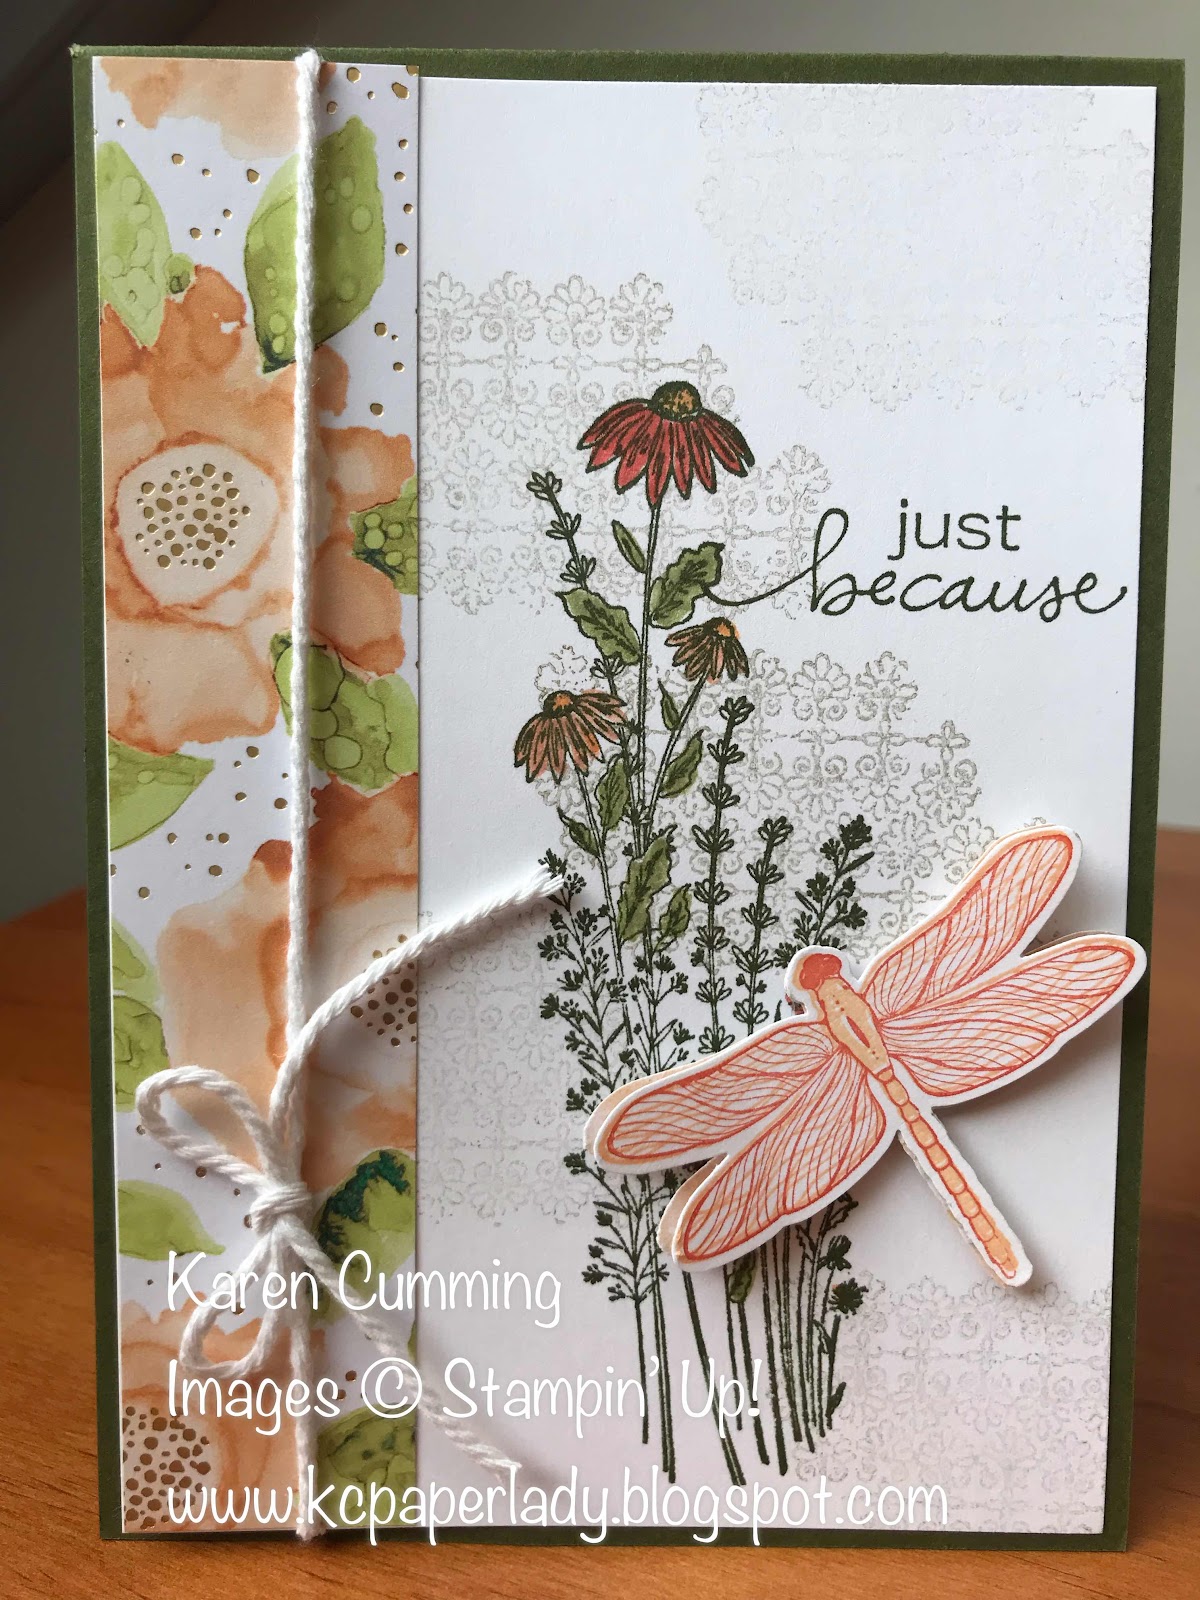
Dragonfly Garden Meets Expressions in Ink - Card One.

 After last week's step-it-up Saturday project, I've been thoroughly enjoying playing with the Dragonfly Garden Stamp Set, and in this project, decided to pair it with the stunning DSP Expressions In Ink.


I've used a background stamp from Tasteful Touches stamped off to give dimension behind the main flower image.  The flowers are coloured with Stampin' Write Markers and the dragonfly is a two-step stamp punched out with the coordinating punch and layered over another punched dragonfly for depth.


What do you think?  Please leave a comment below.  And if you want more information about any of these projects let me know.

Happy Stamping

Karen


Sunday, 29 August 2021

Picture This - Pretty Frame

This die cut is one of my favourites.  It's one of two dies in the Picture This set on page 164 of the Annual Catalogue.


I love how it cuts the circles out and puts the stitching on both the frame and the circles. 

And of course you can use the negative like I have in this card, or as a stencil with ink and daubers.  The cut out circles are great for sentiments and can be layered with a scallop die or punch.  So many possibilities.

The paper in this project is Hand Penned Designer Series Paper on page 131.  There's a lot of colours in this DSP: Basic Black, Blushing Bride, Cinnamon Cider, Daffodil Delight, Garden Green, Highland Heather, Mint Macaron, Misty Moonlight, Pale Payaya and Pool Party!  Wow!  I think it works really well with this card base in Coastal Cabana.

The stamp set is Dragon Fly garden.  More projects coming with that set this week.

Happy crafting!

Karen

Saturday, 21 August 2021

Step It Up Saturday

Today I've got an absolutely gorgeous step it up project for you.  And I confess, I may be falling in love with this stamp set!  

Its called Dragon Fly Garden, and you can find it on page 23 of the Annual Catalogue, Item #154411.  

It coordinates with the Dragonflies Punch.  And if you want to save money, they are available as a bundle.

Anywho, without further ado, let's look at the project!

Casual

The first card was inspired by something I saw on Pinterest.  It's what I call Basic Stamping and it has a very clean and simple style.  I've used the script stamp from Very Versailles stamped in Crumb Cake.  I then stamped the flower image from Dragon Fly Garden in Evening Evergreen - good heavens that's a stunning colour - ever so slightly over the top of the script stamp.  The greeting is stamped in the same colour.  Then for added interest, I stamped the small multiple butterflies in Crumb Cake, again over the top of the script.

Avid


To take my first card to the next level, I've added layers.  The script stamp and butterflies are stamped on a Basic White mat, which is adhered to the card front.  The flower image is stamped, coloured with markers and matted onto an Evening Evergreen layer.  The greeting is stamped, die cut using Tasteful Labels and layered onto Evening Evergreen.  I also stamped the butterflies in Pale Papaya to pick up the colour in the flowers.

Artfully Avid

To go the "whole hog", I added a strip of Designer Series Paper - Expressions in Ink.  And I stamped the large dragon fly onto the same DSP and used the punch to cut it out and raise up using Dimensionals.  I then punched a small dragonfly out of DSP (no stamping) and added to the sentiment panel with a glue dot.


I hope you're inspired to have a go at making one, two or all three cards using the Step It Up method.

Please leave me a comment and let me know what you think!

Happy Stamping!

Karen

Main Supplies & where to find them:

Dragonflies Punch on page 147, item #154240.  And if you want to save money, they are available as a bundle item #156224.

Very Versailles item 149275), page 101 

Tasteful Labels page 166 item #152886 

Designer Series Paper - Expressions in Ink item 155464 page 131.

Ink & Paper - pages 122 & 123.

Thursday, 19 August 2021

Card Making with Scraps

It’s been tough in lockdown Sydney this time around.  And no doubt wherever you are in the country, or the world for that matter, you can relate.

A couple of weeks ago I did a quick (and a little bit silly!) video of me tidying my ribbon scrap drawer!  You can watch it here.

Believe it or not, I actually think lockdown has been awesome for sorting stuff out.  I feel quite liberated.  Today, at any rate!

Here's a few of the projects I whipped up with the scrap bits of ribbon.  Feel free to have a go and  I'm sure you'll increase your stash of ready made cards to have for all sorts of occasions coming up.  Don't forget you can also send a card "just because" and there's no better time than right now in lockdown.


The main image above, with the circles, was made by taking a piece of of one of our Adhesive Sheets (AC page 153, Item #152334):
1. Remove the backing from one side and adhere to a piece of Basic White Cardstock (AC page 136, Item #159228.
2. Remove the backing off the other side of the adhesive sheet - careful, it's very sticky.  
3. Adhere your strips of ribbon to the sticky adhesive sheet making sure you butt them up right next to eachother.
4. Trim your finished piece to size - mine was about 9.5cm x 14 cm.
5. Use the circle die from Picture This (AC page 164 Item #155559) to cut out the circles in a piece of cardstock that measures 10cm x 14.3cm.  Set the circles aside because they'll be great on another project.  I LOVE how the stitching appears on the positive and negative elements of this die.
6. Adhere the ribbon piece to your cardstock base with Stampin' Seal (Snail).  I used a Basic Black base 14.8cm x 10.5cm (AC page 123, Item #121688)
7. Adhere the die cut piece over the top of the ribbon piece using dimensionals (AC Page 167 Item #104430).
8. Using one of the die cut circles that you saved, stamp a greeting and attach with Stampin' Seal (Snail) Adhesive.  Add a little ribbon bow.  Voila!

You could easily make a bunch of the ribbon pieces all in one go, and set them aside as bases to make  more cards another day!

On that note, I'm off to try out some cards with my new stamp set, Dragonfly Garden.  Swing by again to see what I do.

If you'd like to order any of the products I use, visit www.stampinup.com.au 
and please select me as your demonstrator by using my monthly hostcode - for August it's K2DHMNAF

Have a great week and don't forget to be kind to yourself.

Cheers
Karen
xx


Thursday, 1 July 2021

"Pick Six Wonder" Designer Series Paper Workshop

 Yesterday I did an online class with Stampin' Up! where we creatively cut up a pack of DSP and made 14 cards! 

You may know that our DSP consists of 12 sheets of 12"x12", 2 each of 6 double sided designs.  So the possibilities are endless.  That said, we only used one-eighth of the pack to create all fourteen cards, and we even had a bit left over to make a bonus card!  

What I love about doing these kinds of workshops is that everyone had different papers and cardstock, so while we were all cutting the same basic pieces, there was a huge variety of projects.  And one of the best things about starting with a basic idea is that you can let your creativity run wild on the layout, embellishments, and finishing touches.  Something like this would make a great gift of a kit of ready made cards for all sorts of occasion.


This month Stampin' Up! are having a Designer Series Paper Sale, where you can save 15% on select DSP in the current Annual Catalogue.  Take a look at the details here.  And if you're shopping, please be sure to use my July Host Code Q7BGJEYJ.

Saturday, 15 May 2021

Step It Up With The Color & Contour Stamp Set

This is my second attempt at this post, because the first one was deleted by Blogger, and I'm at a bit of a loss as to why.  I guess that's technology for you.  Crafting is so much more straightforward!

Anyway, I'm here to show you a step-it-up technique that is great if you want different options for the same overall design.  It's a bit like baking.  Sometimes you want an easy ready-made sponge cake with jam and cream, and other times you crave a homemade recipe with layers, and then for special occasions you go all out with fresh berries and deliciously good frosting!

I first learned to Step-It-Up from my upline, Veronica Riddle, when we were living in San Diego.  She would encourage us to look at our card creations and see if there was a way to step it up and add interest.  Similarly, if we had a very "busy" design we would try to simplify it to showcase one or two elements only.

Interestingly, this was a topic in our weekly demonstrator-only communication from Stampin' Up! and it resonated with me, so this is what I did:

Casual

To make this casual card, stamp the solid flower and leaf images (Color & Contour Stamp Set) in the ink colours you like directly onto Basic White cardstock.  I chose Blushing Bride, Paly Papaya, Daffodil Delight and Mint Macaron.  Overlay the greeting in a darker ink like Evening Evergreen.  Layer onto a piece of Evening Evergreen cardstock (or your fav choice).  Attach a small piece of coordinating ribbon to the back of the layer so it peeps out to draw the eye towards the sentiment.  Attach to your card base.

Avid

Step this card up by adding dimension to the flowers using an outline stamp in a darker ink - I chose Polished Pink (stamped off first on grid paper), Calypso Coral and Crushed Curry.  I used an aqua painter and Mint Macaron Classic Ink to add colour to the leaves, and the little dotty spotty background randomly stamped around the flowers.  Change up the ribbon my tying a simple knot.

Artfully Avid

My artfully avid card features the additional embellishments - a ladybug and some Genial Gems.  I also made a bow out of the ribbon and added it to the top corner of the card to take the eye across and down the design.  Add coordinating strips of Hand Penned Designer Series Paper to further frame the main panel.

If you'd like to have a go at this technique, start with the casual card as a basic overall design and see if you can step it up too.

Happy Crafting :)
Karen

Products Used:
Color & Contour Stamp Set #154994
Blushing Bride Classic Ink #147100
Polished Pink Classic Ink #155712
Pale Papaya Classic Ink #155670
Calypso Coral Classic Ink #147101
Daffodil Delight Classic Ink #147094
Crushed Curry Classic Ink #147087
Mint Macaron Classic Ink #147106
Evening Evergreen Classic Ink #155576 & Cardstock #155575
Hand Penned Designer Series Paper #155499
Basic White Cardstock #159228
Genial Gems #155500
Ladybug Trinkets #154299 (Mini Catalogue)
Ribbon - from my supplies (retired)


Colour & Contour - Stepping It Up!

I don't know about you, but sometimes I struggle with my card designs - too busy, not busy enough, too plain, blah blah blah!

The effect can sometimes be to stop me making a card before I've even started.  Uh-oh, Mojo Muddle!!

As a Stampin' Up! demonstrator we have lots of resources, but one of my favourites is a regular weekly email with inspiration both from the company and other demo's.  It's gold!  This week's message talked about stepping up a card design.   And that took me down memory lane because my first ever upline, the lovely Veronica Riddle in San Diego, CA ran a class (feels like a lifetime ago) that involved going back through our old card designs, and working out ways to step things up.  The beauty of this is that it makes you look differently at each element, but it also shows you that you can make a simple "casual" design easily, with a minimum of materials and still have impact.

Case in point:

If you want different options for the same overall design, stepping up is easy and fun.  It's a bit like baking.  Sometimes you want an easy ready-made sponge cake with jam and cream, and other times you crave a homemade recipe with layers, and then for special days you go all out with fresh berries and wickedly good frosting!

Casual


To make this casual card, stamp the solid flower and leaf images (Color & Contour Stamp Set) in the ink colours you like directly onto Basic White cardstock.  I chose Blushing Bride, Pale Papaya, Daffodil Delight & Mint Macaron.  Overlay the greeting in a darker ink like Evening Evergreen.  Layer onto a piece of Evening Evergreen cardstock (or your fav choice).  Attach a small piece of coordinating ribbon to the back of the layer so it peeps out to draw the eye towards the sentiment.  Attach to your card base.  

Avid


Step this card up by adding dimension to the flowers using an outline stamp in a darker ink - I chose Polished Pink (stamped off), Calypso Coral and Crushed Curry.  I used an aqua painter and Mint Macaron classic ink to add colour to the leaves, and the little dotty spotty background randomly stamped around the flowers.  Change up the ribbon by tying a simple knot.

Artfully Avid


My artfully avid card features the additional embellishments - a ladybug and some Genial Gems.  I also made a bow out of the ribbon and added it to the top corner of the card to take the eye across and down the design.  Add coordinating strips of Hand Penned Designer Series Paper to further frame the main panel.  

If you'd like to have a go, why not use the casual card as a basic overall design and see if you can step it up too?

Products Used:  Color & Contour Stamp Set #154994; Basic White CS #159228; Evening Evergreen CS #155575; Hand Penned DSP #155499; Classic Ink - Blushing Bride #147100, Polished Pink #155712, Pale Papaya #155670, Calypso Coral #147101, Daffodil Delight #147094, Crushed Curry #147087, Evening Evergreen #155576 and Mint Macaron #147106. Woven Ribbon in Powder Pink (Retired).

Happy Stamping!
Karen

Thursday, 22 April 2021

Card Making Class - May 2021

Here's a little project sneak peak for next month's classes. I am totally in love with this stamp set!  It's so pretty, and the paper is to die for!


Book in for a class on Wednesday 5 May or Saturday 8 May, 10:30am - 12:30pm.  Lots of fun, you'll learn new techniques and take home your own fabulous handmade projects! 


How nice is this Pale Papaya In Colour?


So elegant for an anniversary.


I'm calling this the So Clever technique.  Why?  Because people will say "Aren't you clever" when you give them this card!


You'll learn this technique in the May classes.
Thanks for stopping by!  Hope you can join me!

Happy stamping
Karen 


Friday, 16 April 2021

Ornate Garden Designer Series Paper SUOC 273

I made these cards for the SUO (Stampin' Up! Only) challenge.  This week, the challenge is to use Designer Series Paper.  That's it!  No other requirements.  

Well I love DSP.  I'm the PaperLady afterall.....giggle.......

And with Mother's Day around the corner, and the beautiful Ornate Garden Specialty DSP on hand, this is what I did.


This is a really simple Gate Fold card.  I think it's got WOW factor, how about you?


I think this highlights how well SU's DSP coordinates, both in colour and pattern.  This paper is "Specialty" because some sheets have gold foil designs on them, like the one behind the "Mum" sentiment.

And I really love how these cards stand up.  It's so eye-catching to see something a little different.

This paper is available for $26 and includes 12 sheets, 2 each of 6 double-sided designs, 12" x 12".  The patterns are quite dense so they're great for card making and scrapbooking.  You can find it on page 149 of the Annual Catalogue.

Happy papering!
Karen


Thursday, 15 April 2021

Clearance Rack Refresh

Who doesn't love a bargain?   Be sure to check out the newly refreshed Clearance Rack.  It's a great place to save HEAPS on some really gorgeous supplies.

There's a lot of Christmas supplies on there right now, so pop on over and have a look.  Here's some of what's on offer:

Gleaming Ornaments Punch Pack was $59 NOW $35.40

Wonder of the Season Specialty DSP was $26 NOW $10.40

Acorn Trinkets was $14 NOW $5.60

Joy to the World Paper Pumpkin Kit was $37 NOW $27.75

Most Wonderful Time Product Medley was $122 NOW $48.80  WHHHAAAAAAT?!


Please use my April Host Code 3SWKFYD4 when you're shopping with me!

Have a super crafty day!

Karen

What IS Paper Pumpkin Anyway?!

 Surely it's not a....paper pumpkin.....?!


Paper Pumpkin (PP) is a monthly subscription service that offers a unique variety of paper projects for crafters of any skill level to enjoy.  These all-inclusive craft kits will help you to explore your creativity, try new techniques, and discover the potential in paper crafting.  Sadly, (for now) PP is only available as a subscription in North America.  But every now and then, we get one here in Oz.  Yay!

I always snap these up when available because they contain lots of goodies - both consumable and non-consumable, which means you get some lovely products to "use up", like card bases, die cuts, dimensionals, ribbon and embellishments. But you also get a stamp set and ink spot/s so you can continue to create many more projects.

Check out the Bouquet of Hope Paper Pumpkin Kit.  It's available now while stocks last.  I can't wait for mine to arrive in the mail!

View the video by clicking the link, or find it in YouTube.


Wednesday, 14 April 2021

A Cute Idea For Special Someone & Co-Ordinating Dies Special Day

 Here's a card I made for a friend's birthday this week.


This set has co-ordinating dies and both are (sadly) retiring soon.

The colours I've used are Mango Melody & Whisper White (now Basic White).  The cutie raccoon is stamped in Early Espresso.

What I love about this set of products is that you can stamp and cut out just about every image with the dies.  So the cut flower is complete as is the string for the balloon.  That's clever crafting, a time saver and super easy!

If you want this set, don't dilly dally!  It'll be gone before you know it.

Happy crafting

Karen

Wednesday, 7 April 2021

2 Ideas Using Soon To Be Retired Dandelion Wishes

 All good things must come to an end!  And this year's Stampin' Up! Annual Catalogue finishes very soon.

There are lots of gorgeous products on sale and you can view the retiring list here.

Here's a couple of ideas for you using the Dandelion Wishes Stamp Set.


Item #151345

In both of my samples, the backgrounds were made using markers coloured directly onto a stamp block, then lightly spritzed with water.  I then pressed the block onto Stampin' Up! Shimmery White Card Stock.  I used this particular base because it holds water quite well, and behaves more like watercolour card than our Basic White/Whisper White.  You also get a lovely shimmery finish that catches the light, so it adds another dimension to your project.

If you're shopping this month, please select me as your demonstrator and use the April Host Code on checkout:  3SWKFYD4

Happy stamping!


Thursday, 28 January 2021

The Perfect Card to Send on International Friends Day

 February 4th is International Friends Day!

What a perfect opportunity to send a handmade card or four ;)

So here's a cute idea for a card you can make.  It's a quick one to make because you use Designer Series Paper in layers for depth.  I chose Free As A Bird (149468)  for the sentiment panel, Pick out the colours from the DSP & use the co-ordinating inks to stamp the images.  


This one uses Woven Heirlooms (149306). 


On both cards I've used retired DSP - I've always got lots of scraps, so I like to find ways to use them up, and this is a great card for that!  I distressed the edges of the stamped layer and used a sponge to add ink which gives a vintage feel.


Why don't you have a go?  Sort through your stash and find something you love.  Cut, stamp, assemble and you'll be ready to send to a friend and make their day!

Happy stamping.


Thursday, 1 October 2020

My Favourite Stampin' Up! Colour

That's a big claim!   Do you have a favourite?  Or does your favourite change depending on the theme, the season, the style, or just your mood?!

Colour is so good at influencing mood isn't it?  Or does mood influence colour?  A question to ponder.....

Anyway, today I'm loving Night of Navy.  That's the colour of the base of this Triple Cube Pop Up Box card.  The DSP is from the pack of In Good Taste (item #152494).  It's a slightly different pack because it contains 24 sheets: 2 each of 12 double-sided designs.  Each sheet measures 12" x 12"..


Products Used:

Daisy Lane & Dandelion Wishes Stamp Set

In Good Taste DSP

Petal Pink Classic Ink

Medium Daisy Punch

Flourish Thinlits

Stiched Shapes Thinlits


I'm really enjoying making these cards.  Hope you like this one!

Happy stamping

Karen


Wednesday, 2 September 2020

Get Ahead Christmas Stamp Camp


There's nothing like getting a head start on something, right?

And with so many lovely kits in the holiday catalogue, it was a no brainer to get going on our Christmas gift tags.

The Tag Buffet kit is very pretty with it's Real Red, Garden Green, Gold and Shaded Spruce colour scheme.  There's lots of die cuts, and a few extras to ad-lib with.  The sentiment panels are also die cut and the matching stamp set provides lots of options.

We had a fun day, and as usual, my group of ladies came up with some stunning original designs.  I'm always fascinated how we can all start with the same materials and end up with so many pretty projects.

Here's a sampling:


If you'd like to order the products to make your own project:


Tag Buffet Project Kit Item #153649 $52

Tag Buffet Stamp Set Item #153612 $31

Classic Ink - Real Red Item #147084

Classic Ink - Shaded Spruce #147088

Classic Ink - Garden Green #147089

Order online here.  Use this month's host code for a little something extra from me: WHKGKQJ6


Thanks for stopping by.

Happy Crafting!
Karen