Showing posts with label Elements of Style. Show all posts

Wednesday, 9 January 2013

Little Birdhouse

After all those Christmas projects (which I LOVED making!), it was time for a change of pace.  And I wanted to make a special gift for my friend who loves to collect birds nests.  

Rather than rushing out and shaking the tree in my garden and tossing some poor bird out of it's home.....giggle.....it's ok, I would never do that, I too am a lover of all creatures great and small so I made this:


The actual house comes in kit form and you glue it all together.  Very simple.  However, it's good to cover the main pieces with cardstock or DSP first so you can use them as templates.   I also painted the base with a mixture of white paint to which I added Soft Suede & Early Espresso ink.


I love the roof.  It was made using the eyelet border punch and layering each piece with mounting tape on top of the last, starting from the bottom.  The front and rear gable ends were done with the large Scallop Edgelit (127019).  


The little birds were glued on with Tombow Liquid Glue.   The flowers are not SU.  They come in a bunch so I snipped them off the stems and added them wherever I felt like it!  I do wish SU would bring out some flowers.  I really wanted a vintage look and wasn't satisfied with the ones I made from cardstock so I bought these but they were a bit silky and wedding-y, mmmmmm nevermind.  I cut the grass by hand with scissors.  Just snip little wedges out till you get 'the look'.


The DSP is Parisien Breeze.  Long retired, still a fav of mine.  The leaves are from the Two Step Bird Punch in Gumball Green.


You can't have a vine growing up the side of your birdhouse without a ladybug.  So there it is!


 I stamped over the DSP with stamps from Elements of Style, Creative Elements & Tiny Tags.

I do hope this inspires you to whip out your craft supplies for a nice 3D project.  There's lots to choose from and when you decorate with SU, you have a gorgeous end result.

Thanks for stopping by!
Cheers
Karen


Thursday, 6 December 2012

Tile us you like us!

This is one of my tiles that I'll have for sale at North Sydney Market on Saturday.   Oooh I love stamping on different materials.


Swing by and say hi!

Cheers
Karen

Wednesday, 30 May 2012

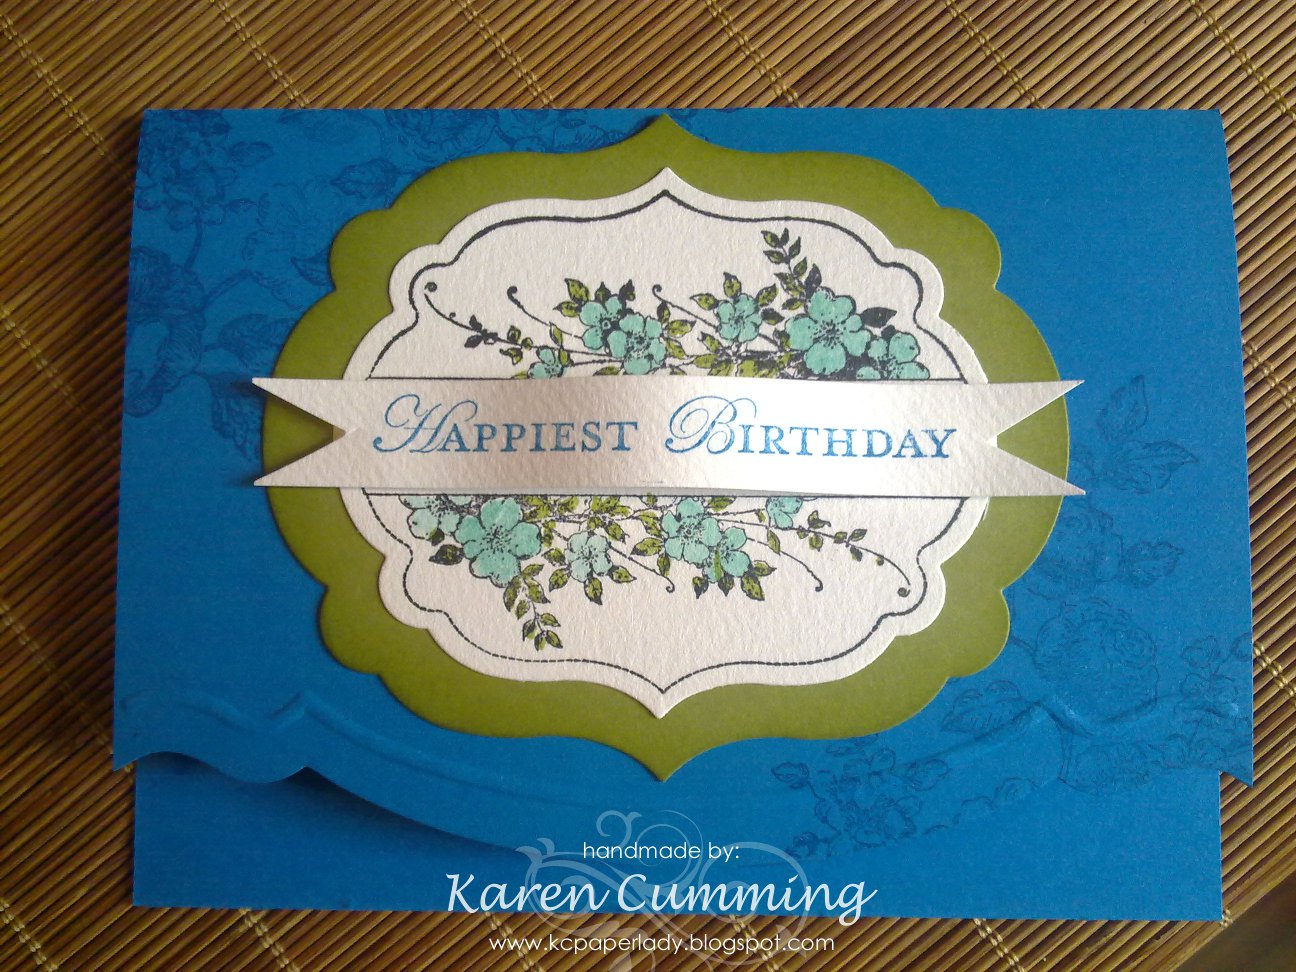
Happiest Birthday

Apothecary Art & the Framelits Dies are just two of the lovely products in the current Autumn-Winter Mini Catalogue.  I've been playing with them a bit this week and have a few cards to show you.
Here's the first one:

The flowers are coloured using our Stampin' Write markers.  I love the look of the Pool Party blue with the other colours.   I've sponged around the edge of the Lucky Limeade layer to give it some extra definition.   The largest image from Elements of Style was used to stamp on the Pacifc Point card base.


I've used the Edgelits & Adorning Accents embossing folders together on the bottom edge of the card.  This is quite tricky!   It helps if your cutting plates are new - mine aren't and they're very bent so it's a bit of a struggle to keep the Edgelit in place.  I find drafting tape works quite well because it's low tack but you still have to remove it carefully otherwise you may tear your cardstock.  I don't think it matters whether you emboss or cut first.  I've done it both ways and it doesn't seem to make much difference.   However, the embossing folder is sized for a US greeting card (5.5" x 4.25") which means it's about 8mm too short for our card width of 148mm.  Technical, I know, but it's still too damn short!   TIP: cut your cardstock to 140mm or 14cm first, then it's much easier to line up to cut & emboss.

Supplies used:
Stamps: Apothecary Art & Elements of Style
Cardstock:  Pacific Point, Lucky Limeade & Watercolour Paper
Ink:  Pacific Point, Black StazOn, Lucky Limeade Stampin' marker & Pool Party Stampin' marker
Big Shot with Framelits Dies, Edgelits & Adorning Accents embossing folders.

Happy Crafting!
Karen

Monday, 3 October 2011

Nice packaging!

According to my husband, this is a Samboy box.  I think they were drink containers that you used to freeze??

Anyway, it's a gorgeous shape for packaging little gifts.  This one has a small trinket box with a fob watch top inside.   I love the results.   I guess the downside is that you have to destroy it to get it open, but if you only put a bit of snail onto the centre fold it does come away easily.


The DSP is Beau Chateau.  Isn't it lovely?  I love this paper because it goes with the Elements of Style stamp set which I've used to make the tags.


I paired it with the Box #2 die for the Big Shot to make this little Marina Mist chocolate box.  This shade of blue works really well with Chocolate Chip and Early Espresso.  I love the Boho Blossoms punch to layer small flowers and the pearl is a perfect embellishment.


What could be better than a couple of passionfruit truffles from Belle Fleur?!  Yum!

Hope you have enjoyed the long weekend.  See if you can finish it with a craft project!
Karen

Wednesday, 7 September 2011

Vintage Style

My daughter likes to make cards and gifts for her close friends when they have a birthday.   She's got a great eye for design and loves to pick out supplies from my stash (don't know where she gets that from!).  Anyway, I've been making a few things with the products from the Beau Chateau Suite and there's a number of finished projects lying around.

I love what Hayley's done with the ribbon here.   


Also inspired by the flowers on the new catty cover, these little blue one's are lovely.   Don't you love these glass bottles?   They are juice bottles from a local cafe.   Won't be throwing any of them away in future!

Hope you're enjoying the week.
Cheers
Karen

Wednesday, 29 June 2011

Faux Pearl

I love this technique!   I did a class on it using Rose Red and it was so pretty I decided to try it with Marina Mist.  This is a gorgeous blue and works with many styles of card.    These cards used the same supplies except that I changed the stamp set.   I originally designed them as my first attempt to get published.  Well, they didn't make the cut, but I still love them!  


I like the contrast of Marina Mist with Basic Black.   The punched flowers are made using the Boho Blossoms punch and our pearl jewels.    The flower on the sentiment is made by punching out and layering two of the boho blossom flowers from a leftover scrap of the faux pearl cardstock.  

The faux pearl technique uses gloss card stock so if you want to stamp on it you must use StazOn otherwise the ink won't dry.   You start with your piece of gloss cardstock - mine is white.  Then you scrunch up a piece of plastic wrap and dip it into some shimmer paint that you've put onto a paper plate.  Wipe of the excess paint and then dab it onto your cardstock.  Make sure you leave some white space so that your ink colour will show up darker in some places.   Wait for the paint to dry.  Then you use a light colour ink on a brayer (Speedball is my favourite because it is softer and has a bit of "give" in it) to roller over the cardstock.   Once it's covered to your liking, polish the excess ink off with a tissue.  Then cut your cardstock however you like, stamp on it and finish your card.  Easy!


The flower stamped on this card is subtle because it's a fine line image.   But I like the way it contrasts with the solid bird.

Masculine cards are a constant challenge for me.  But I think you can adapt this technique to suit a more male card by switching the stamp set.   I've used Sense of Time here and I'm really pleased with the results:


The black brads are a great addition and the crimper is my go-to tool for turning cardstock into an embellishment when I'd normally use ribbon.   

This last card is a bit busy.  I stamped the base card tone on tone using Marina Mist ink on MM cardstock. The faux pearl is used on the clock face, the sentiment and on the strip of cardstock that goes behind them.  The pearl jewels give a royal feel to the card and I've "dirtied" it up ever so slightly by roughing up the black circle layer behind the clock face.


So, that's my take on faux pearl.   It's another great technique using shimmer paint & a brayer.  Because it's quite soft, you could use it in landscapes as a gorgeous sky or sunset.  Why not give it a try?  

Supplies Used:
First two cards:
Stamp Set:  Elements of Style
Cardstock:  Marina Mist, Basic Black, Glossy White.
Ink:  Black StazOn, Marina Mist Classic
Accessories:   SU's Shimmer Paint in Platinum, White narrow grosgrain ribbon, Marina Mist satin ribbon, Jewels - pearls.
Tools:  1" circle punch, 1 1/4" circle punch, Boho Blossoms punch, Scallop Oval punch, brayer, plastic wrap & paper plate

Last two cards:
Stamp Set:  Sense of Time
Cardstock: Marina Mist, Basic Black, Glossy White.
Ink: Black StazOn, Marina Mist
Accessories: SU's Shimmer Paint in Platinum, Black grosgrain ribbon, Jewels - pearls, black brads
Tools: 1" circle punch, crimper, 1 3/8" circle punch, brayer, plastic wrap & paper plate

Thanks for looking!   I love reading your comments, so let me know what you think.

Happy Stampin'
Karen