Sunday 23 December 2012

12 Days of Christmas - Day 12 Neighbour Gifts

It's the last day!   I have so enjoyed this little project expose and I'm already looking forward to next year and finding lots of new things to make and share.

Every year I like to do something with chocolate coins, and this year is no different.  These would make great little stocking stuffers, neighbour gifts or perhaps be a good standby if you need a last minute 'something'.


I've used Ornament Keepsakes to stamp these twice, cut them out with the framelits and use glue dots to stick them to each side of a chocolate coin.  The colours are Cherry Cobbler & gold (doesn't show up very well).  The gold one is heat embossed.

I made the hole in both ornaments together with a 1/8" punch so they line up.

This is an idea I got from my upline Linda Higgins.  Its the larger tag from the Two Tags die.  I've stamped randomly on them and attached ribbon through the slit in the top of the die cut.  The ornaments are from my favourite local gift store, Bella Emporio. 

I wish you and your families a very Merry Christmas & a Happy, Healthy New Year.
You come back now!
Karen

Saturday 22 December 2012

12 Days of Christmas - Day 11 Happy Hanukkah Card

My project for today is a quick one.


I've clear embossed the medallion.  To do this, stamp in the classic ink first, then use your Stamp-a-majig to realign the image and stamp again in Versamark.  Add your powder, heat & watch the majic happen.

Supplies Used:
Stamp Set: Jewish Celebrations
Cardstock: Whisper White & Marina Mist
Ink: Night of Navy & Versamark
Embossing folders:  Dots, Petals a Plenty, Chevron & Elegant Lines
Clear embossing powder, heat tool, Stamp-a-majig
Rhinestone Jewel

3 more sleeps!
Cheers
Karen

Friday 21 December 2012

12 Days of Christmas - Day 10 Cookie Decorating Kit

It's Day 10 & I'm thinking about yummy Christmas treats.

Combine that with my passion for snowflakes, and voila!  You've got snowflake sugar cookies all baked and ready to decorate.

We have the most gorgeous cookie stamps and they are really easy to use!
 
 Round treat cups are perfect for sprinkles and they have a self adhesive base that you add a punched scallop circle to.  You'll need the 2 3/4" size.


I've used a small cello bag for the icing.  Stampin' Up! carry a smaller bag which would look better but I didn't get my order in on time!  Oops!  
Then all you need is a cute package.  Brown paper bags are popular this year (Trace!) and I love them with red and white accents, so the snowflake die and my version of Rudolph make another appearance.  The tag is from Tags Till Christmas.
Another gift idea may be to whip up some placemats with our yummy fabric.  I nearly fainted with joy when they brought out the Spice Cake fabric despite the fact that I don't sew!  Yay, thanks SU!  Thankfully my daughter loves to sew.  Pretty good for year 9, don't you think?!
Yes, I'm proud of her talent!
So that's it for day 10. 
Have a super Friday!
Cheers
Karen

Thursday 20 December 2012

12 Days of Christmas - Day 9 Gorgeous Packaging

If you follow my blog you'll know I'm almost as passionate about the packaging as I am about the gift!   And this year we seem to be luckier than ever with the beautiful products we have on offer in the Holiday catalogue.  Now if you're an Aussie, you may not like the use of the word "Holiday" but it's appropriate because there are products for Halloween, Hannukah, Autumn harvest time and Valentine's Day as well as Christmas.  And they're all on sale until the end of January 2013.

Anyway, back to Day 9 and here's some gorgeous packaging ideas to make your gift stand out under the tree.


 This bag is re-purposed.  It's from one of my local stores.  Not now, it's from me!!  I've used the Comfort Cafe DSP again, added the snow flakes & a gorgeous tag from Tags Till Christmas. 

 Yes, I know the Bashful Blue wide grosgrain is retired, but scratch around in your ribbon scraps and you might be lucky enough to find a piece!


My favourite is definitely this box.  For two reasons; first its re-purposed from Stampin' Up! when it held Watercolour Wonder crayons and second because it's now got one of Felicity's amazing soy candles inside!  Actually, I may have to keep it for myself.  No!  I've already been my own secret Santa....twice! 


I'm lovin' the tulle & the Holiday Frame embossing folder looks amazing on the Top Note.  Yum!  Stamps from Joyeus Celebrations are getting a real work out......


.....and that Cherry Cobbler Seam Binding is a breeze to work with, it's hot glued to the inside of the lid so you don't need to use too much.

Lastly, a CASE from the Holiday catty.  Mine's a little different, but the idea is the same.


Bet you wish you came to class last night now don't you?!  Yep, that was one of the projects.

So, it's the 20th folks, get packing!
Want to see a sneak peek of tomorrow's project......
just kidding!
Pop back then!
Karen

Wednesday 19 December 2012

12 Days of Christmas - Day 8 Teacher Gifts

It's always a challenge to come up with something new and exciting for the teachers each year.

But let's face it, they are inspirational, hard working, incredibly dedicated and already have a cupboard full of soap, mugs & chocolate!  

I hope this inspires you to make something memorable for that cherished person who has so much influence in the lives and futures of our children.


The "apple" may look familiar.  I first made it after Convention this year when Brian Pilling from the SU home office in Utah showed us how.  However, my first attempt was rather more like a pear!  I did this to prove I can make it the right way up!  I do hope you like it.


My second gift is a tin gift card holder. I have used some items from my craft stash that are not Stampin' Up! so I can't name them here. A little embarrassed to admit I bought them when we lived in America so I've had them a while. Always knew they'd be useful!


This is the inside of the tin - before the gift card is added! The letters were done with the Calendar Alphabet & Numbers Set, (R)

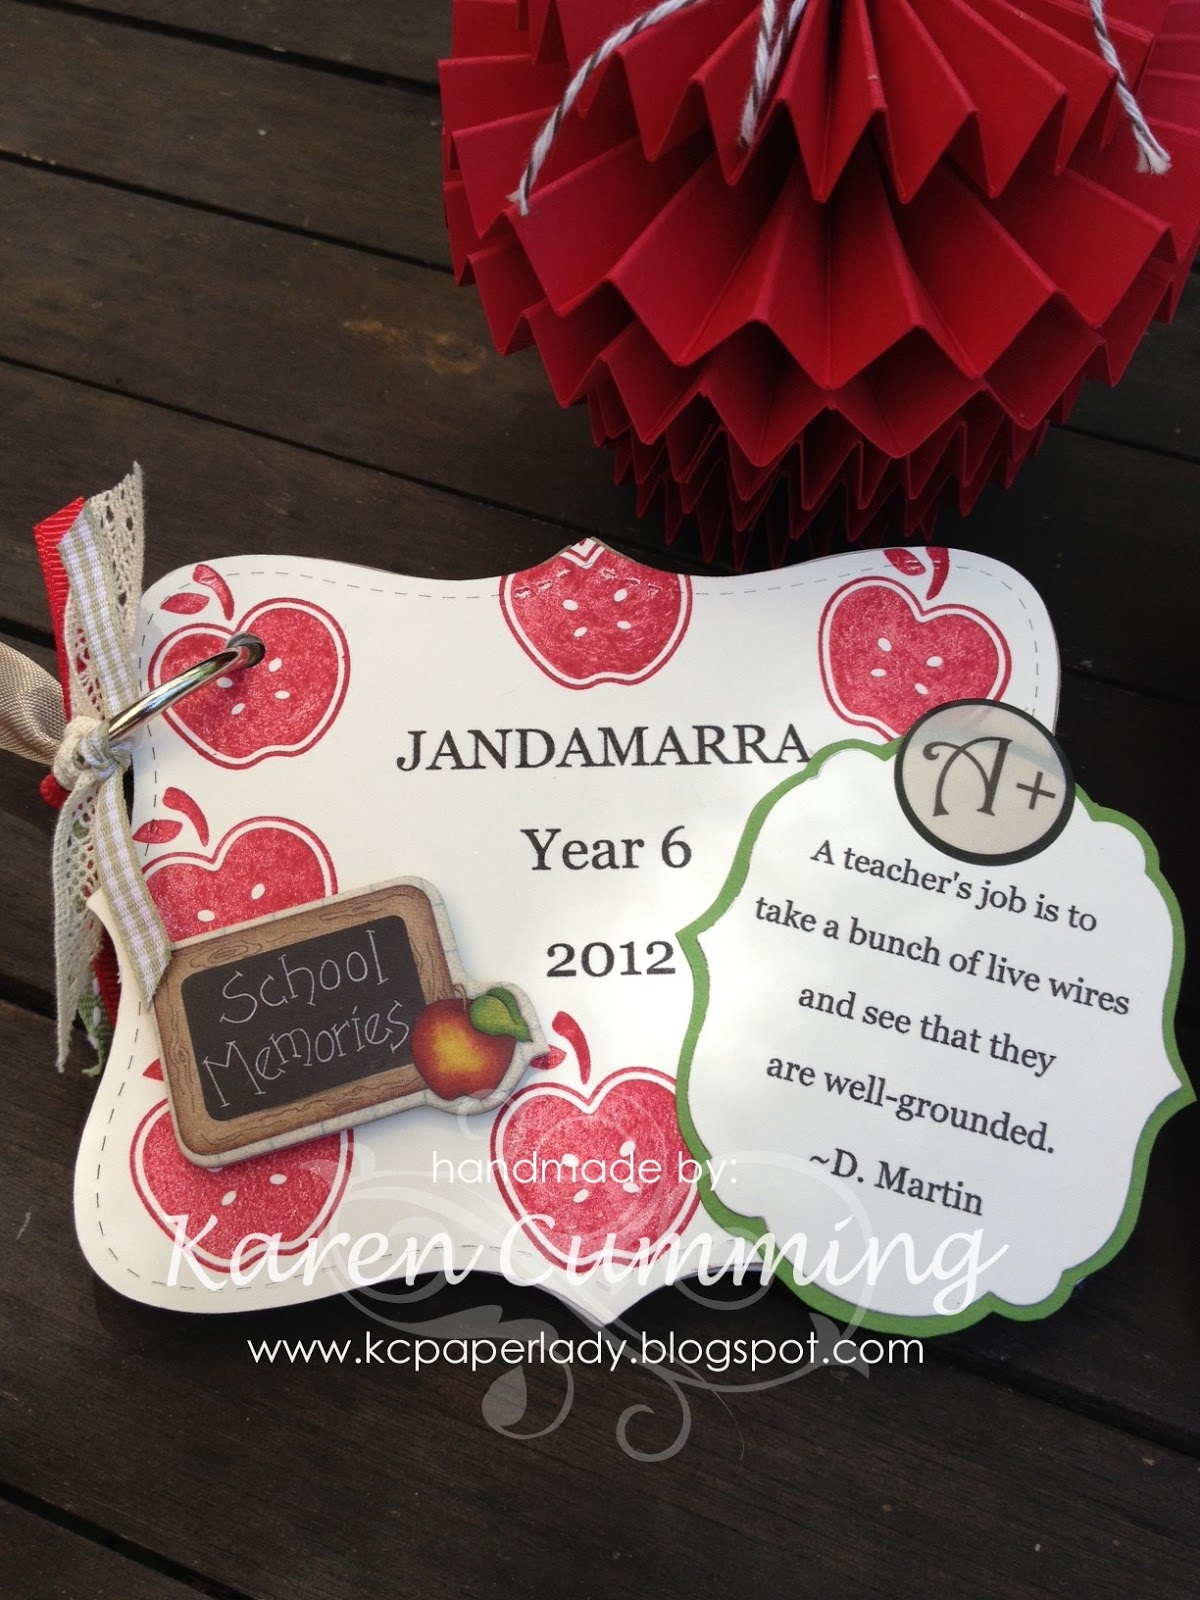
Lastly, a very personal gift.  This is instead of a card.  I had all the children in my daughters class write a special message for their teacher on a Top Note that I die cut and stamped an apple on to.  I hope it will be a lovely memory for her in year's to come.  The front & back cover were made using heavy duty cardboard that often comes in our packs of paper and the like.  I used Sticky Sheets to adhere a vanilla cover and stamped it with apples from the Tart & Tangy set (R).   The framelits are great for the quotes, and all the text was done on the computer. I punched a hole in the top left corner of each page with the Cropadile and an "O" ring holds it all together.     Ribbon in various colours and styles finished it off (all SU, I might add!)

Craft your heart out!
Karen

Tuesday 18 December 2012

12 Days of Christmas - Day 7 Snowflakes & Ribbon Card

When you have designer series paper that you love, it's an added bonus to find it's suitable for a variety of occasions.  I just discovered this with Comfort Cafe.  


I like the balance in this card, the colours are gentle and I've incorporated vintage brads, glimmer paper & lace.  Some of my favourite things!

Supplies used: 
Stamp Set:  Greetings of the Season. By far, the BEST Christmas greeting set I've ever had!
Cardstock:  Crumb Cake, Early Espresso, Very Vanilla, Marina Mist
Silver Glimmer Paper
Ink: Marina Mist
Designer Series Paper:  Comfort Cafe
Snow Flurry Die & Petals a Plenty Embossing Folder for the Big Shot
Blossom Punch, 1 3/4" Scallop Circle & 1 3/8" Circle
Crumb Cake Seam Binding & Lace ribbon with an Antique Brad.

Wishing you a very happy and productive day!

Cheers
Karen
P.S.  Tomorrow is the LAST day for the current Clearance Blitz Promotions.  Don't miss out!

Monday 17 December 2012

12 Days of Christmas - Day 6 Decorated Candle Jars

Hi Everyone

I am really enjoying doing these projects!  I hope you like them too!

This is an easy way to turn your old jars into pretty decorations to fill with candles, tealights, or even coloured stones & sand.

The decorations are all on the outside so safe to burn without the fear of setting the house on fire!  Always a bonus!


This first jar uses up the negatives from the Snow Flurry die.  It's just silver glimmer paper & I've used glue dots to attact it to the outside of the jar.   Blue wide grosgrain ribbon makes a lovely bow, and although you can't see it, there's a candle inside from a previous post.


This jar lends itself beautifully to the Triple Layer Doily punch (R) because it looks like a snowflake when used on the last setting.  Attaching them was tricky.   I first tried vellum adhesive but it wasn't strong enough.  Scratch that!  Then I found my old zyron sticker maker and that worked really well.  For any stubborn bits I used a mini glue dot.  The Champagne snowflakes were punched and cut in half.  Cherry Cobbler seam binding was used for the bow.  If I was doing this again though, I'd use our SU sticky sheets to adhere to the glimmer paper before punching out.  But beware, those triple layer punches are a bit tempermental (aren't we all at this time of year!!) so you might have to try a small piece first.

 
This gorgeous scented burgundy candle was stamped with White Craft ink (R) but you could use Staz On instead.  I've used the tissue paper technigue, details in a previous post.  I love this technique because the candle burns as is.


So there you have it.  A lovely table display for the festive season.

Enjoy your day!
Karen


Sunday 16 December 2012

12 Days of Christmas - Day 5 & SUO #60 A Sparkly Tree Card

Today's card is all sparkly.


It doesn't need an explanation as to how it was made, but here's the supply list for you if you'd like to have a go:

Stamps:  Lovely as a Tree, Greetings of the Season, Joyeus Celebrations (bow)
Cardstock:  Very Vanilla, Always Artichoke, Bashful Blue & Silver Glimmer Paper
Paper:  Festival of Prints DSP
Ink:  Always Artichoke Classic & marker, Island Indigo
Accessories:  Faceted buttons, Dazzling Details
Scallop Circle punch, paper piercer, Snow Flurry Die & Big Shot.

Don't you always need "just one more" card?!

Have a super day.
Karen

Saturday 15 December 2012

12 Days of Christmas - Day 4 Rosette Tree Ornament

I have really enjoyed making ornaments this year and with the one on the cover of the current holiday catty, I've had plenty of inspiration.   However, we don't always have time to make something that detailed, so with that in mind, here's a simpler ornament.

I've used the rosette die (125594) to cut a piece of dsp.   You will have a piece that has two different decorative edges.  You need to cut one of these edges off.  

Because the piece is 12cm wide, if you cut it in half to 6cm you will have the beginnings of 2 rosettes. 


To make your rosette nice and full you will need to cut 2 pieces out so you have a length of 24cm.  You join the two pieces together using sticky strip so it's nice and strong.  Then you form a circle by joining the outside ends together too.


Using your silicone mat, grab your glue gun and put a generous squirt into the centre of the mat.


Then gently manipulate the paper circle thingy into a flat rosette and carefully plop it on top of the hot glue.  Hot glue dries very quickly except when it's in a big blob like the one pictured so you have a few seconds to get it on there.   You'll want to fiddle with the folds to make sure it's even.


Hold it in position for 30 seconds or so until the glue has dried enough to hold the rosette in place.

Then you can go ahead and add a snowflake centre, or another smaller rosette like I've done, a little punched circle and a button.  Yep, sometimes I don't know when to stop.

 
The scallop edge on the rosette is perfect for threading bakers twine through to hang on your tree.
 
Handy Tips:   I mentioned the width of the rosette die as 12cm.  That means it would make a rosette thats 24cm in diameter because each piece you cut makes half the size of the circle (or the radius).  OMG maths!   You would also need at least 2 lengths because the wider the strip, the further it has to go to make a circle.  Confused?  Super!!
 
My finished rosette is 12 cm diameter - so how big are my strips?   If you said 6cm your right!  Go to the top of the class.
 
For the little Old Olive one I cut the strips to 2cm wide to make a finished rosette of 4cm diameter.   I still used two lengths so it's nice and full.
 
Thanks for checking in today!  
 
Cheers
Karen


Friday 14 December 2012

12 Days of Christmas - Day 3 Triple Time Card

I thought a Triple Time card was appropriate for today.  This is a really popular technique at the moment (I like to be on trend....giggle giggle..).   However, I've chosen none traditional colours which is kind of unlike me because I seem to be heading red & green all the way this year! 


I've used the Delicate Doilies stamp set in Elegant Eggplant & Rich Razzleberry.  Don't you love having a product that can stretch out it's usefulness all year long?   And I've spiced it up with silver metallic ink - it was a pad that we used to carry at SU but is now retired.    This particular one is great because it's an embossing ink but if you are prepared to wait a few minutes, it will dry nicely without heating, especially if used on dark cardstock. 


The greeting & mistletoe images are from the lovely Joyous Celebrations stamp set in the holiday catty right now (only until 31 Dec).  BTW I've heat embossed the greeting even though it's stamped in classic ink (Elegant Eggplant).  You just have to move quickly and get the powder on it immediately. 


White Organza ribbon & self adhesive rhinestones complete the shimmery look.  I cheated with the bow.  It's separate from the ribbon that goes across the card.  I attached the horizontal ribbon on the back of the largest white layer with snail.  Then the bow is attached with a glue dot.  If you are bow challenged like I used to be, this is the BEST ribbon because it's really easy to tie a gorgeous bow and it doesn't crease no matter how much you fiddle with it.

Dimensions for making a triple time card are as follows:

Card Base : A5, or 14.8 x 21cm folded in half
White or neutral layers:  143mm x 100mm
                                         113mm x 73mm
                                          83mm x 40mm
Coloured cardstock layers (same colour as base):  118mm x 78mm
                                                                                   88mm x 45mm.

1. Attach the 3 white/neutral layers together with dotto or repositionable adhesive, making sure they  are all centred nicely.
2. Stamp your images all over randomly, or as I like to say with "studied carelessness"!
    You'll hate the way they look right now but DON'T PANIC!
3. Carefully separate the 3 layers, and attach them to their appropriate coloured cardstock layer with snail.   I like to do these one at a time starting with the smallest piece so I don't accidentally flip the images and stick anything upside down.  Easier to do than you think!
4. Add your sentiment, ribbon, etc etc and THEN stick the whole thing to the card base.

I do hope you're enjoying my Twelve Days of Christmas projects.  Show me some love and leave me a comment....please!

Karen
                                         

Thursday 13 December 2012

12 Days of Christmas - Day 2 Snowflake & Ornament Garland

For today's project I decided I wanted to make a simple ornament garland.


I've done these type of decorations as single ornaments to hang on a tree.  But I like the way it looks as a garland and think it would be fabulous festooned across the ceiling to a centre point, maybe a light fitting or something similar.

Here's what you do:

1.  Ball Ornament: Using the 1 3/4" circle,  punch out about 6 shapes (you can use more but I probably wouldn't use less than 5 because they look better when they're plump!).   Fold each circle in half and use snail to stick them all together.


2.  Use hot glue to attach a piece of cord to the spine of the ornament, then fold the last two sides together and adhere with snail.

3.  For added sparkle, use the Snow Flurry die and Glimmer Paper to cut out a bunch of snowflakes.

4.  Attach them to the cord in between each of your "ball ornaments" using hot glue.


5.  Hang where it makes you happy!


See you tomorrow!
Karen

Wednesday 12 December 2012

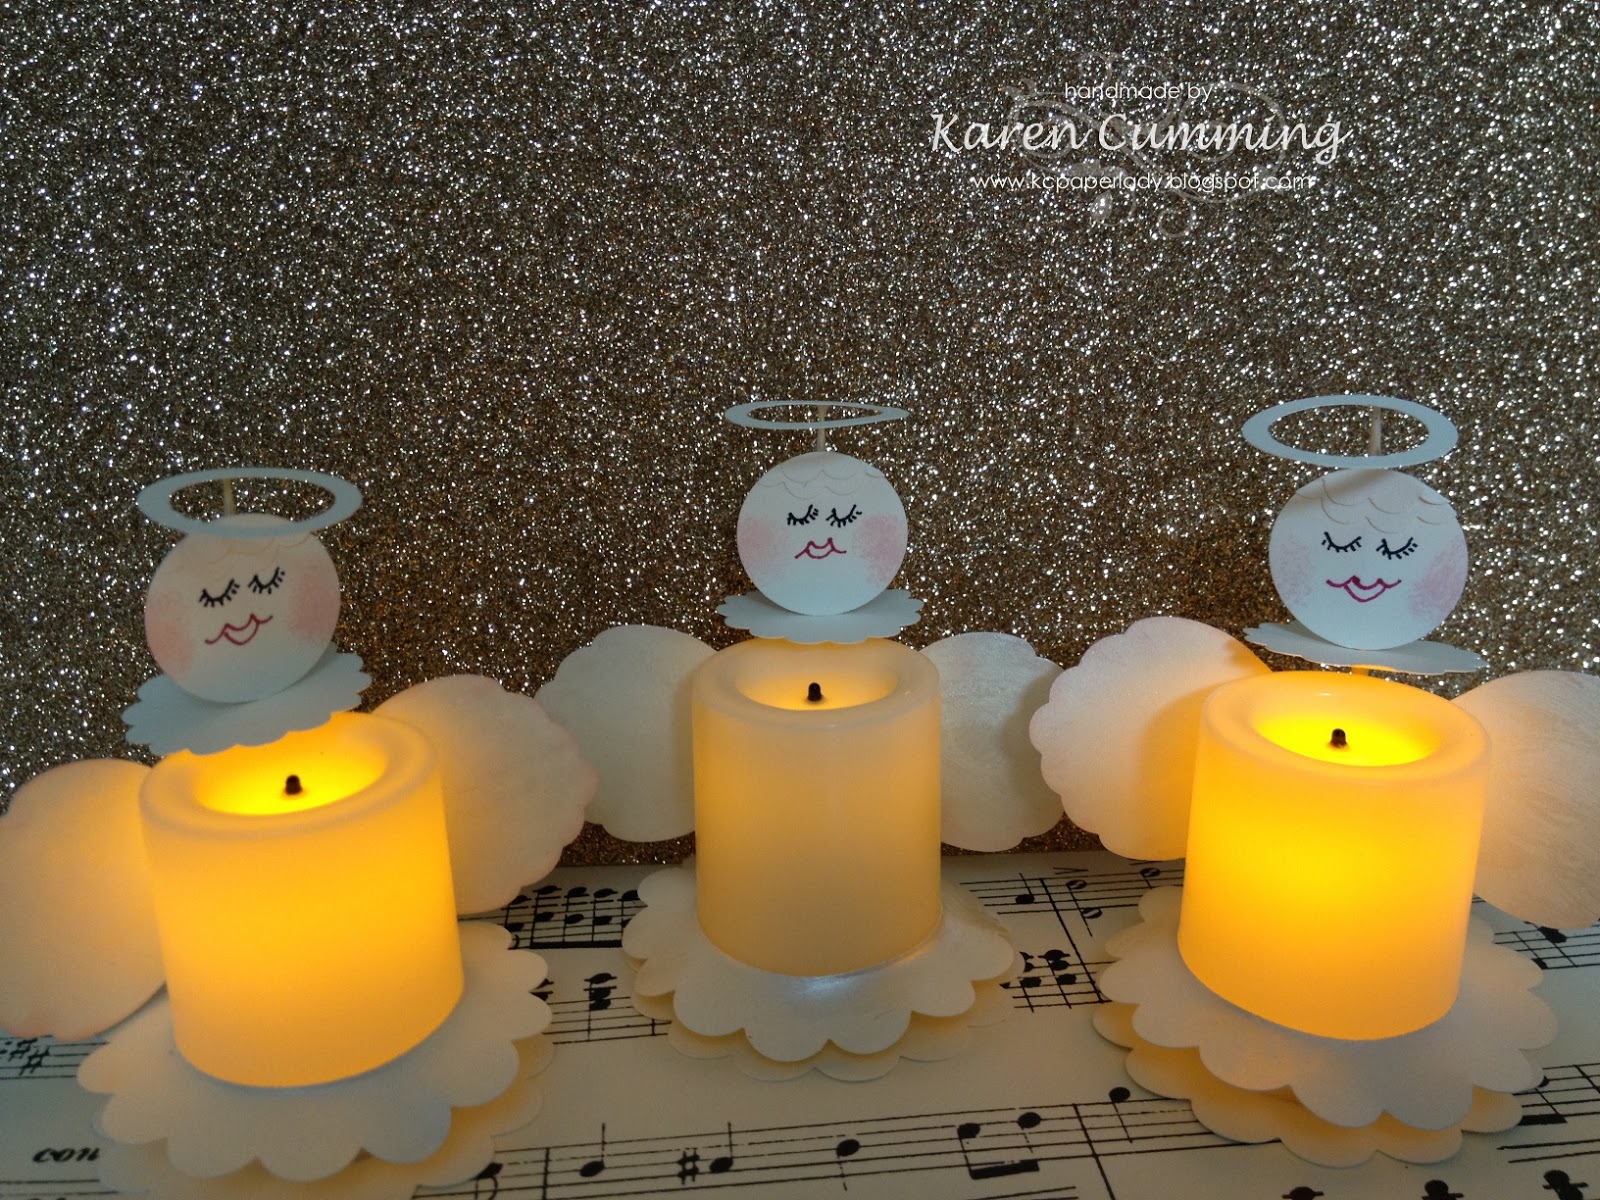
12 Days of Christmas - Day 1 Angel Votives

I've been wanting to do this for a couple of years now, so I'm excited that I'm finally getting on with it! 

My first project is a bit cutesy, a bit crazy and possibly a tad strange!!

I was inspired to do something with these battery operated votives that I bought after I made Becky Roberts' snowman.  

Anyway, they're my take on a votive angel.


Here's what you do:

1. Punch out a 2 3/8" scallop circle. Use the itty bitty punch pack to punch a circle out so you can switch the votive on and off.  Glue it to the base.


2.  Skirt. Punch a 1 3/8" circle, then with the 2 3/8" scallop circle punch over the top so you have a scallop with a big hole in the middle.  Sponge all over with frost white glimmer paint.  Once dry, slide it carefully over the votive to make the skirt.

3. Halo:  Punch out a 3/4" circle then go back over it centreing the 1" circle punch.  Glue this to the very top of a toothpick.  I used Tombow but hot glue would be quicker.


4.  Face:  Punch a 1"circle.  Hand draw eyes and lips.   Use a dauber with pink ink for the cheeks. 
I added hair by attaching a couple of rows of the scallops from the small scallop punch.  Hot glue this to the toothpick just under the halo.

5.  Punch a 1 1/4" scallop circle.   Use the 1/16" punch to make a hole in the centre.  Slide this up the toothpick so it forms a frill around your angel's "neck".

6.  Hot glue the toothpick to the back of the votive.

7.  Wings;  punch two of the largest petals from the blossom builder punch.   Sponge them with glimmer paint and dauber around the edges with Pink Pirouette ink.  Attach them over the toothpick at the back of the votive with hot glue.

Hope you enjoyed this quirky little project.

Be sure to pop back tomorrow for day 2!
Cheers
Karen