Friday 26 October 2012

Christmas Snowflakes

As promised, here's a card using the emboss resist technique on the large snowflakes, with ink splotches randomly splattered onto the card stock.  You can find instructions for emboss resist here.


The splotches are made by mixing a few drops of reinker with rubbing alcohol (Isocol brand used here).  Don't worry, the antiseptic smell disipates really quickly!

I've used Bashful Blue ink to sponge around the snowflakes and Midnight Muse for the greeting and small snowflakes.

The Midnight Muse border was punched using the Scallop Ribbon Punch.

Cheers
Karen

Thursday 25 October 2012

Pleasant Poppies

Thought I'd have another go with this stamp and the wash technique over the embossing.

This is the same technique as my last post but I've used a wash made of Marina Mist mixed with isocol and I put it in the chamber of an aqua painter which makes it easy to use.  You can also use this method to get spotches of ink onto your projects - I'll show you that tomorrow!

Then I went over the blue with a Pumpkin Pie wash made using water only.  

What do you think?

Hope you are having a good week and now looking forward to another weekend!
Cheers
Karen

Wednesday 24 October 2012

Heat Embossing with a Wash

This is a technique that has been around for a while.  When I got the Pleasant Poppies stamp, I thought it would lend itself beautifully to embossing and it didn't disappoint.


So. to get this look here's what you do:

1.  Using an embossing buddy to remove static from your cardstock by rubbing it all over the card.
2. Stamp your image onto the white cardstock using Versamark Ink.
3. Cover the image with white embossing powder.  Tap off any excess.
4.  Use your heat tool to heat the embossing powder until it becomes opaque and shiny.  Don't overheat it or it will flatten out and look dull.

You've just completed "Heat Embossing"


Now, to Emboss Resist:
 
1.  Using a wash made of a few drops of  re-inker (I used Bravo Burgundy) and a couple of sprays of water from a mister - I like to use the old lid of a brad box to mix it in, paint over the embossed image.   The effect should be uneven and streaky.  You're not looking for a solid finish, but a wash effect.
2.  Once dry - it should only take a couple of minutes - gently wipe any ink off the embossed area with a tissue.  The embossing "resists" the ink and you get that gorgeous "popped" effect.

If you'd like to see the finished card, checkout my facebook page here.

Thanks for looking!
Cheers
Karen


Tuesday 23 October 2012

Your Once, Twice, Three Times a Stamper...!

This is a new technique that's quite popular right now.  So much so that it will be incorporated into my next classes on 2 & 7 November.  Check out the class page at the right of this post for more info.

It's called Triple Time, for fairly obvious reasons, and you can get all sorts of looks depending on the stamps and colours you choose.

This one was my first attempt and I like how it turned out. 


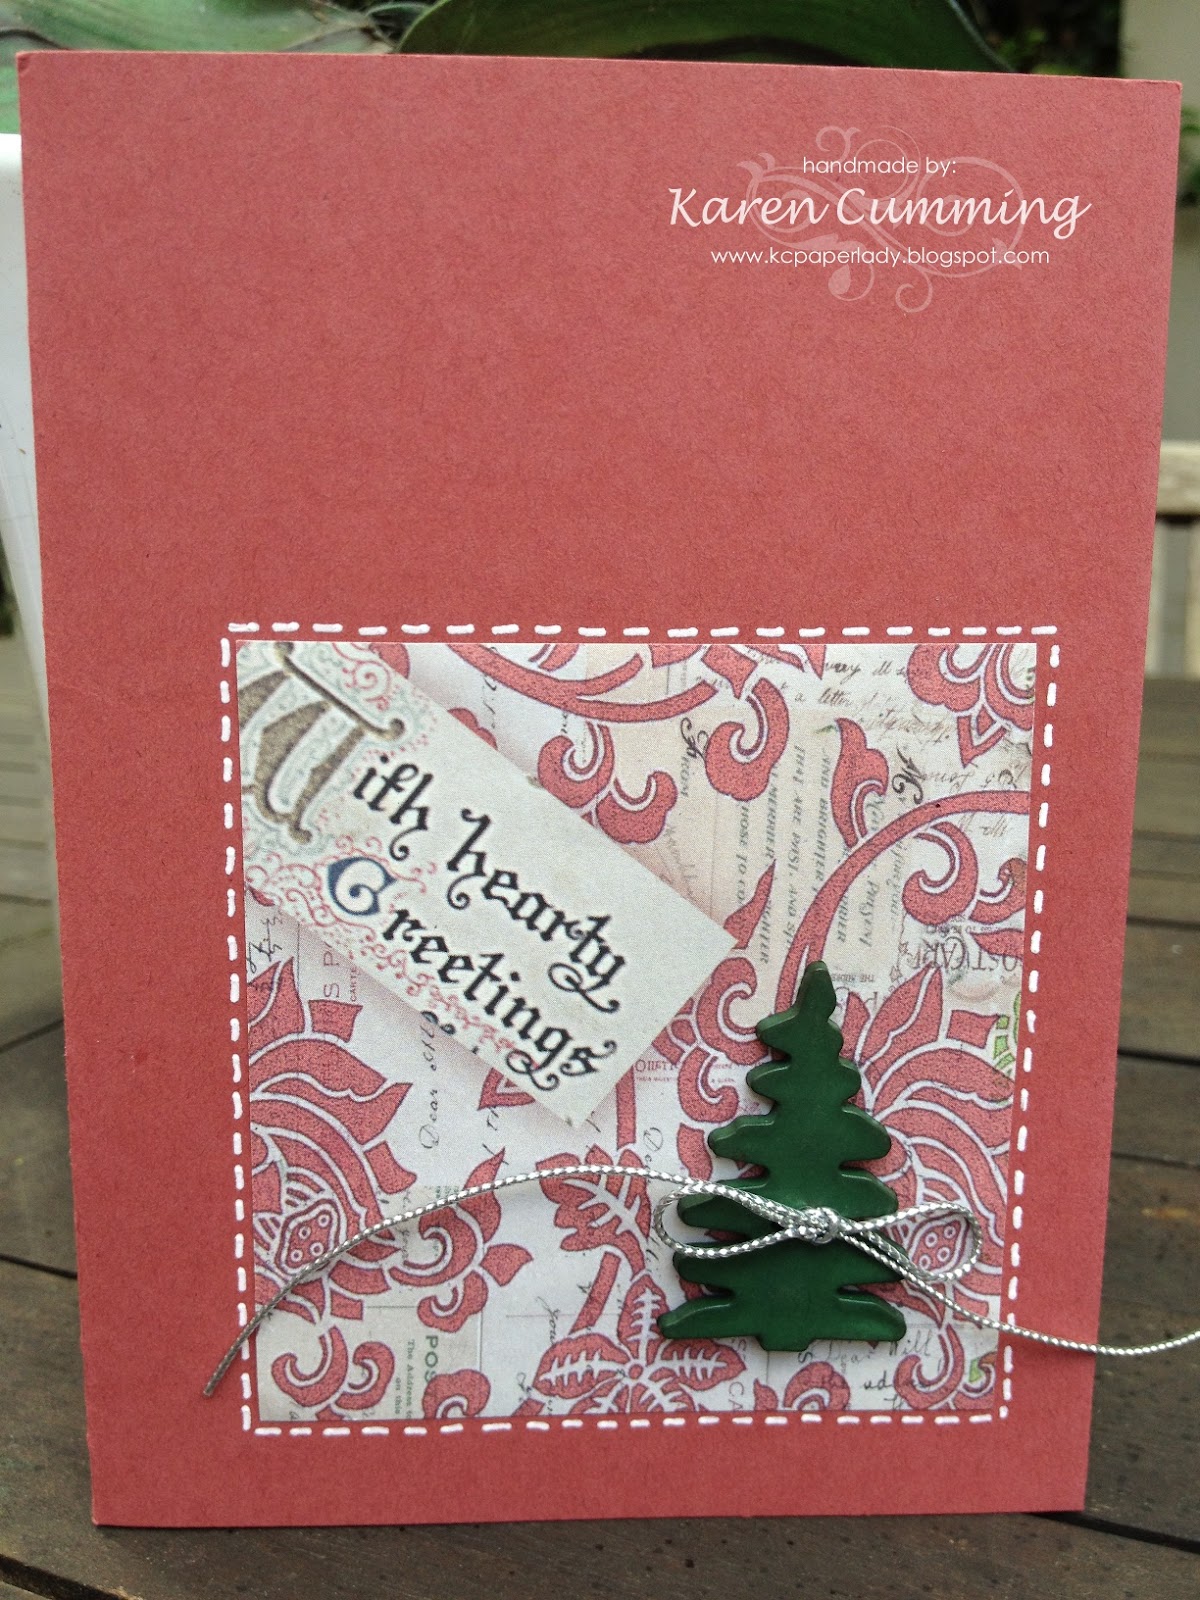
It uses Spiced Paisley stamps in Gumball Green, Midnight Muse & More Mustard.  The card base and mats are Crumb Cake, and the stamped layers, Whisper White.   I chose the sentiment from Best Dad Ever because it's a card that I think would work for a male, not too fussy, not too pretty!

This is one of my favourite sets - Creative Elements.


 I LOVE that flower. And it's stamped in Elegant Eggplant, and I'm a fan of purple.  The flourish from the same set was done in Melon Mambo.  The sentiment looked a bit lost so I put a flare on it with the rhinestones.  Tip:  when you get your rhinestone jewels from SU, they come in 4 different sizes.  The smallest ones are in 3 rows.  They are attached together, with 21 in each row and designed to be used that way.  I've seen so many people cut them into singles, only to reassemble them in a row!!! Funny eh?!

Finally, I had to do a Christmas Triple Time using Scentsational Season. 


Crumb Cake, Gumball Green & Real Red are the ink colours.  I added some glitz to the gingerbread man so his little buttons would stand out.  The greeting is from For My Family.  A great set for everyone!

Book a class and get the inside scoop on this lovely new technique!
Cheers
Karen

Monday 22 October 2012

Antique Haberdashery

I just wanted to share this little gift I made for someone who loves old fashioned girly things.


Isn't it cute?  I got the idea at a craft show and thought it would be a great way to use up some of Stampin' Up!'s lovely ribbons and lace.  The frame and spools are all made from chipboard and I've painted everything in white acrylic that I watered down with spreader medium so it looks like a wash.   To age it somewhat and make the surface look textured I used the Tea Stain ink from Stampin' Up!'s Distress Essentials kit (R).  I also used sanding blocks to soften the look.

The lettering was preprinted and cut out from a piece of craft cardstock.  The numbers stamped are from the Calendar Alphabet and Numbers set.   I also used brads from SU's neutrals pack for the tops of each spool.

Happy Monday.  It's a windy day in Sydney so hope you are tucked up nice and warm somewhere.
Cheers
Karen

Friday 19 October 2012

Easy Vintage

Is there such a thing?  I'm not sure, but these cards certainly were easy and have turned out to be quite elegant too.

I was packing away my DSP from today's class when I came across some leftover Presto Patterns.  Long retired???? Not sure, but I had the idea to sponge the cardstock to make the pattern pop.  You see it's a white embossed pattern on white cardstock.....totally gorgeous, but hard to see.

This first card is sponged in River Rock ink.  Then stamped with the images from Established Elegance in Early Espresso, Baja Breeze & Crumb Cake.  The sponging is best done by starting on the outside edges and working into the middle.  Because the paper already has the embossed pattern it resists the ink.   It's then layered onto Early Espresso cardstock.  To get the card opening at the bottom, simply slice your A4 in half longways, so it ends up being 105mm x 297mm.  The Baja Breeze ribbon is folded and held in the centre by the Vintage Brad.  I used a large glue dot to attach it to the card.  The greeting is stamped before being punched out with the Modern Label then sponged around the edges.   I also used a piece of the Presto Patterns Specialty Paper on the inside as the card is too dark to write on, and I'm loving the look!


My next card was oh so simple........I've only sponged over the embossing this time.   The flourish was stamped in Crumb Cake and is from Elements of Style.  The greeting is from Curly Cute stamped in Early Espresso.   Pearl jewels attached as flower centres give it that little bit of "special".


Lastly, I've used a Crumb Cake base to frame this gorgeous piece of Presto Patterns that was sponged in Baja Breeze ink.  I've really worked the ink around the pattern so that it stands out.  Early Espresso wide grosgrain (retired) and vintage lace add a nice touch and the greeting is a good one for any occasion, stamped in Early Espresso.  Rhinestone jewels add that touch of elegance and the Decorative Label was sponged in Baja Breeze.

So, why not dig around in your stash, you might have some of this specialty paper, and remember, "let the paper do the talking", it may be all your card needs!

Enjoy the weekend.
Cheers
Karen

Many Thanks

I needed a few thank you cards to make a gift pack for a friend, and I came across a lovely clean design by Heather Tiley, so I had to have a go.


The thing I like about these cards is how fresh they are.  The colours in the dsp are Rich Razzleberry, Lucky Limeade & a muted Daffodil Delight.

Using the embossing folder (Tulips) like this is also a nice way to get a frame top and bottom, don't you think?


I decided to stamp inside each card (I don't normally do this, but always like it when I see others do it!), and add a little strip of the dsp as well.   I actually did this on a separate layer of whisper white, mainly because the card felt flimsy and likely to fall over.  Probably because the ww cs is not quite as thick as our coloured cs.


I love to read your comments, so feel free to say something!

Have a great weekend!
Cheers
Karen

Thursday 18 October 2012

Crafting Again

This was our 3rd Annual Christmas Cards for Australian Armed Forces card making day!   I started this activity in 2009 and just had a few of my friends and customers making cards.  Look how it's grown!

We had such a lovely time on Sunday.  And I was so fortunate to have lots of help this year so the actual setting up and clearing up was made super easy.  Thanks ladies!  A big thank you goes to my lovely friend Lee who helped pre event and on the day was amazing organising all the prizes.  And to Liz, for running in at the end to help clearing up and count the cards, despite having already had a busy day with other commitments.

I would also like to thank the wonderful support we received from C'est Bon & Baker's Delight, both on the main street in Rozelle, for their donations of quiches, fresh bread & cakes.  Lunch was so yummy, thank you for your community spirit.

Here's some pics.......oh and by the way, we made 882 cards on the day.  And there's more coming!  


Prizes!  Yay, who doesn't love a good game and a Stampin' Up! prize?  Stampin' Up! came through again with a donation of prizes for the event.  The ladies were thrilled as usual, and once again I was able to demonstrate how this wonderful company supports great causes.  No doubt it will work both ways because once you've used our products you have to have more.  They're so good!


A surprise visit from the army.

Margaret is asking our soldier if he'd like to make a card for the cause!  He was a good sport, and managed to make something following her expert tutoring!

This is how much we LOVE STAMPIN' UP!

This is what you do when you win!
Ok, it's back to making something!
Thanks for looking.
Cheers
Karen

Tuesday 9 October 2012

Mojo Monday 262

I'm way out of my comfort zone here!  This is the first coiled fabric flower I've made.  And based on that, I used Summer Smooches DSP.  A paper I love, but because of all the colours I find it hard to choose what to put with it!  Argh, too many choices for me today!!  If you saw how many combinations I had, you'd think I'd gone crazy.


Anyway, let me know what you think.  It's a bit busy for my taste, but it came out ok in the end.  And I'm going to play with those sticky rounds some more.  I really like them!

Supplies used:
Greeting from the long retired Warmest Regards Stamp Set
Cardstock:  Whisper White, Daffodil Delight
DSP & Fabric: Summer Smooches
Two Step Bird Punch
Bitty Banners Framelits
Jumbo Sticky Rounds
Scallop circle was made using a die for the Big Shot from my stash
Rhinestone jewel.

Have a super day!
Karen

 “Knowledge is knowing a tomato is a fruit; Wisdom is not putting it in a fruit salad.” - Brian Gerald O’Driscoll

Saturday 6 October 2012

Not Christmas

This is another "what's on the desk" post.   I'm racing out the door so I won't dilly dally, but did want to tell you that the tag is actually one from a new sweater I got at Jeanswest.  I "altered" it slightly, and voila!


Enjoy the weekend.

Karen

Friday 5 October 2012

Quick Christmas Cards

Stampin' Up! introduced rub ons some years back, and I'm embarrassed to say that I still have rather a lot of them left over.

They actually make cards really quick and easy!   And if you were lucky enough to buy the co-ordinating designer series papers and rub-ons, you've got the job done double quick!

The word JOY is the rub on here.  The chipboard stars are covered with glitter.

First time I've tried this funny little fold to make a Christmas tree.  I got the instructions on Pinterest here.  This is our new christmas dsp - Be of Good Cheer

Again, the rub on is the greeting.  And how yummy is that paper?  Christmalicious!

I think these were call Jolly Holiday, but I'm not sure.  Anyway the main colours are Old Olive, Real Red, Chocolate Chip & Very Vanilla.  Not matter how many times I use non-traditional colours (and I do like them too), I always find myself returning to this combo.

Go dig out your rub-ons and see what you can whip up in a flash!
Cheers
Karen

Thursday 4 October 2012

Northern Flurry Style

I loooove this embossing folder.  It makes the quickest cards and is so beautiful on it's on that you can dress it up, or not!


Doesn't glimmer paper make great snow flakes?  That's the new Bigz die.  Love it!


The cute little reindeer are from my stash.  And the sentiment is from Heard from the Heart, which sadly retired this year.  I am not selling that set, no way!!

I have a couple of cards for you tomorrow using rub-ons.  See you then!
Karen

Wednesday 3 October 2012

Getting my Christmas Stash Going

Do you need a lot of Christmas cards each year?  I think I usually send around 50!  That's a lot to make, especially as I also do the cards for our Aussie Armed Forces (check out the page to the right if you'd like to get involved).   So I started playing around with designs.  Here's what I have so far:


I always end up liking some more than others, but getting down and dirty, so to speak, is the best way to really hone in on the final masterpiece!   And I'm not a big fan of production lines so making lots of different cards is always easier for me.

Have you started your Christmas cards yet?  Watch out for my stamp camp coming up in November.  Join us, you'll be ready in no time!

I'll pop back tomorrow with a couple more designs.

Happy Wednesday.
Karen

Tuesday 2 October 2012

Whats on the desk?

As I was cleaning my desk, rare but true, I decided to leave the scrap bits and bobs and use them to make a project.  This can be a great way to spark your creativity especially if you've got leftovers.   Like many of you I'm sure, I have a little drawer that I stash leftover punch pieces and other stuff, but sometimes I use that drawer as an excuse to hide it all away and not feel guilty because I "threw" it away.

Anyway, here's the first project I made:


It's CAS, a style I'm growing more and more fond of.   It doesn't mean boring or lacking in technique, just uncomplicated and "not busy".  Well, that's my take on it anyway.

Supplies Used:
Stamp Set: Yummy (R)
Cardstock:  Whisper White & Coodinations Cherry Cobbler
Ink: Cherry Cobbler & Platinum Shimmer Paint
Hearts Embossing Folder & Elegant Lines, Labels Framelits
Tools:  Big Shot, Sanding Block
Accessories:  Chipboard Heart & Rhinestone jewel.

Have a lovely day!
Karen